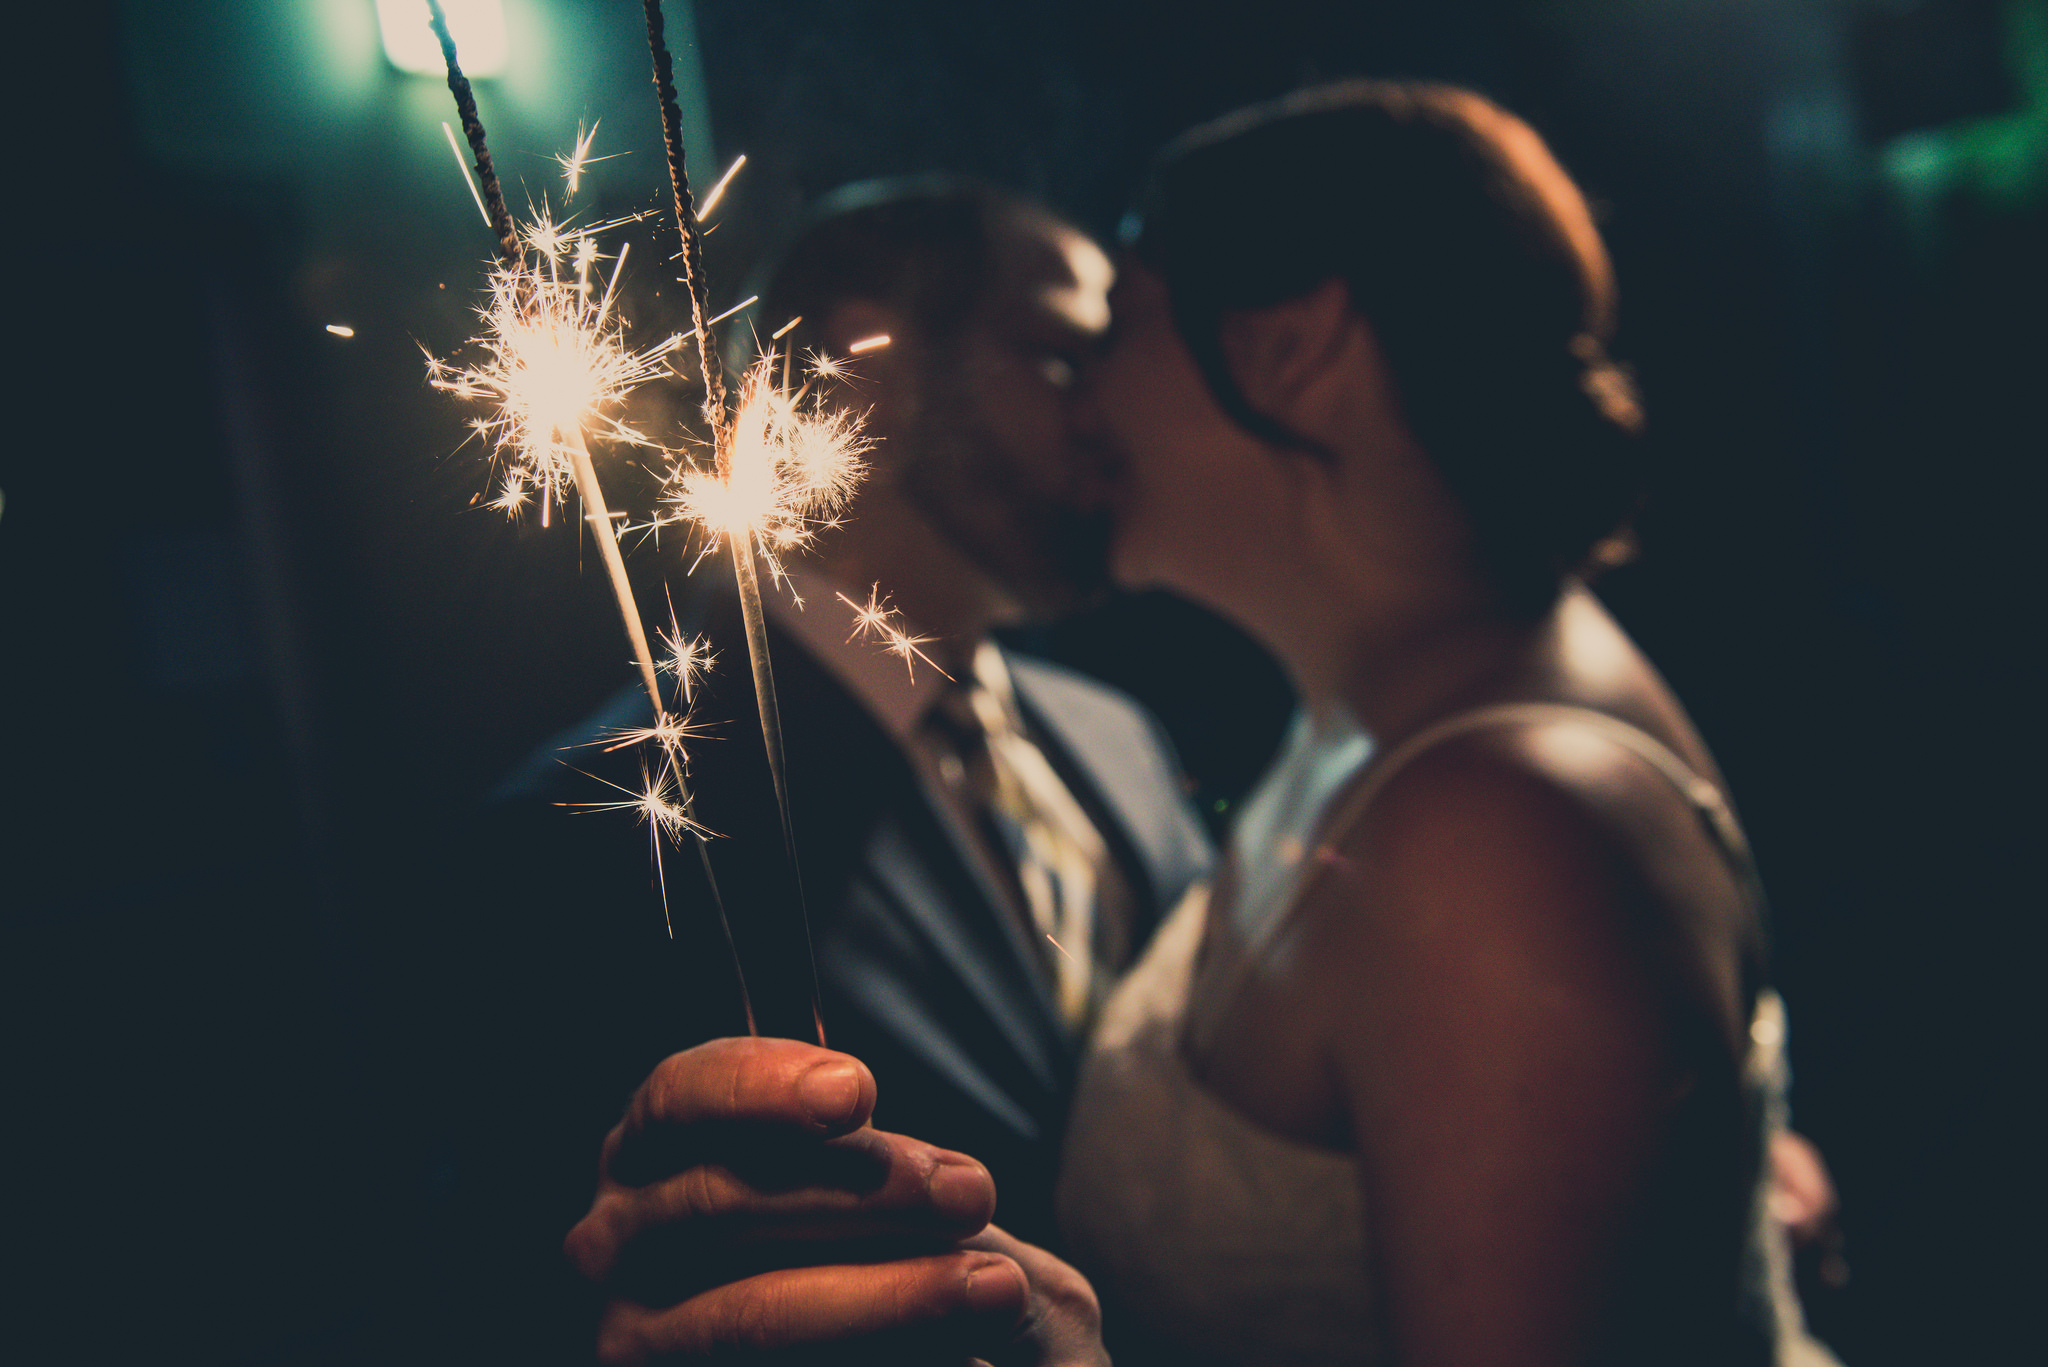
When my husband and I decided to get married and have a proper wedding instead of eloping like sensible people, we agreed that we wanted to throw a fun party for family and friends but not spend an exorbitant amount of money (that we did not have anyway). I didn’t have any interest in asking for any money from either of our parents for the wedding (although his mom gifted us the catering, which was a wonderful gift) so we went with an inexpensive venue and I decided to make the invitations, programs and decorations myself. And be my own wedding planner! I won’t say it was easy — we were so fortunate to have help from family and friends — but I think what we pulled together represents who we are as a couple pretty perfectly. And it was a lot of fun.
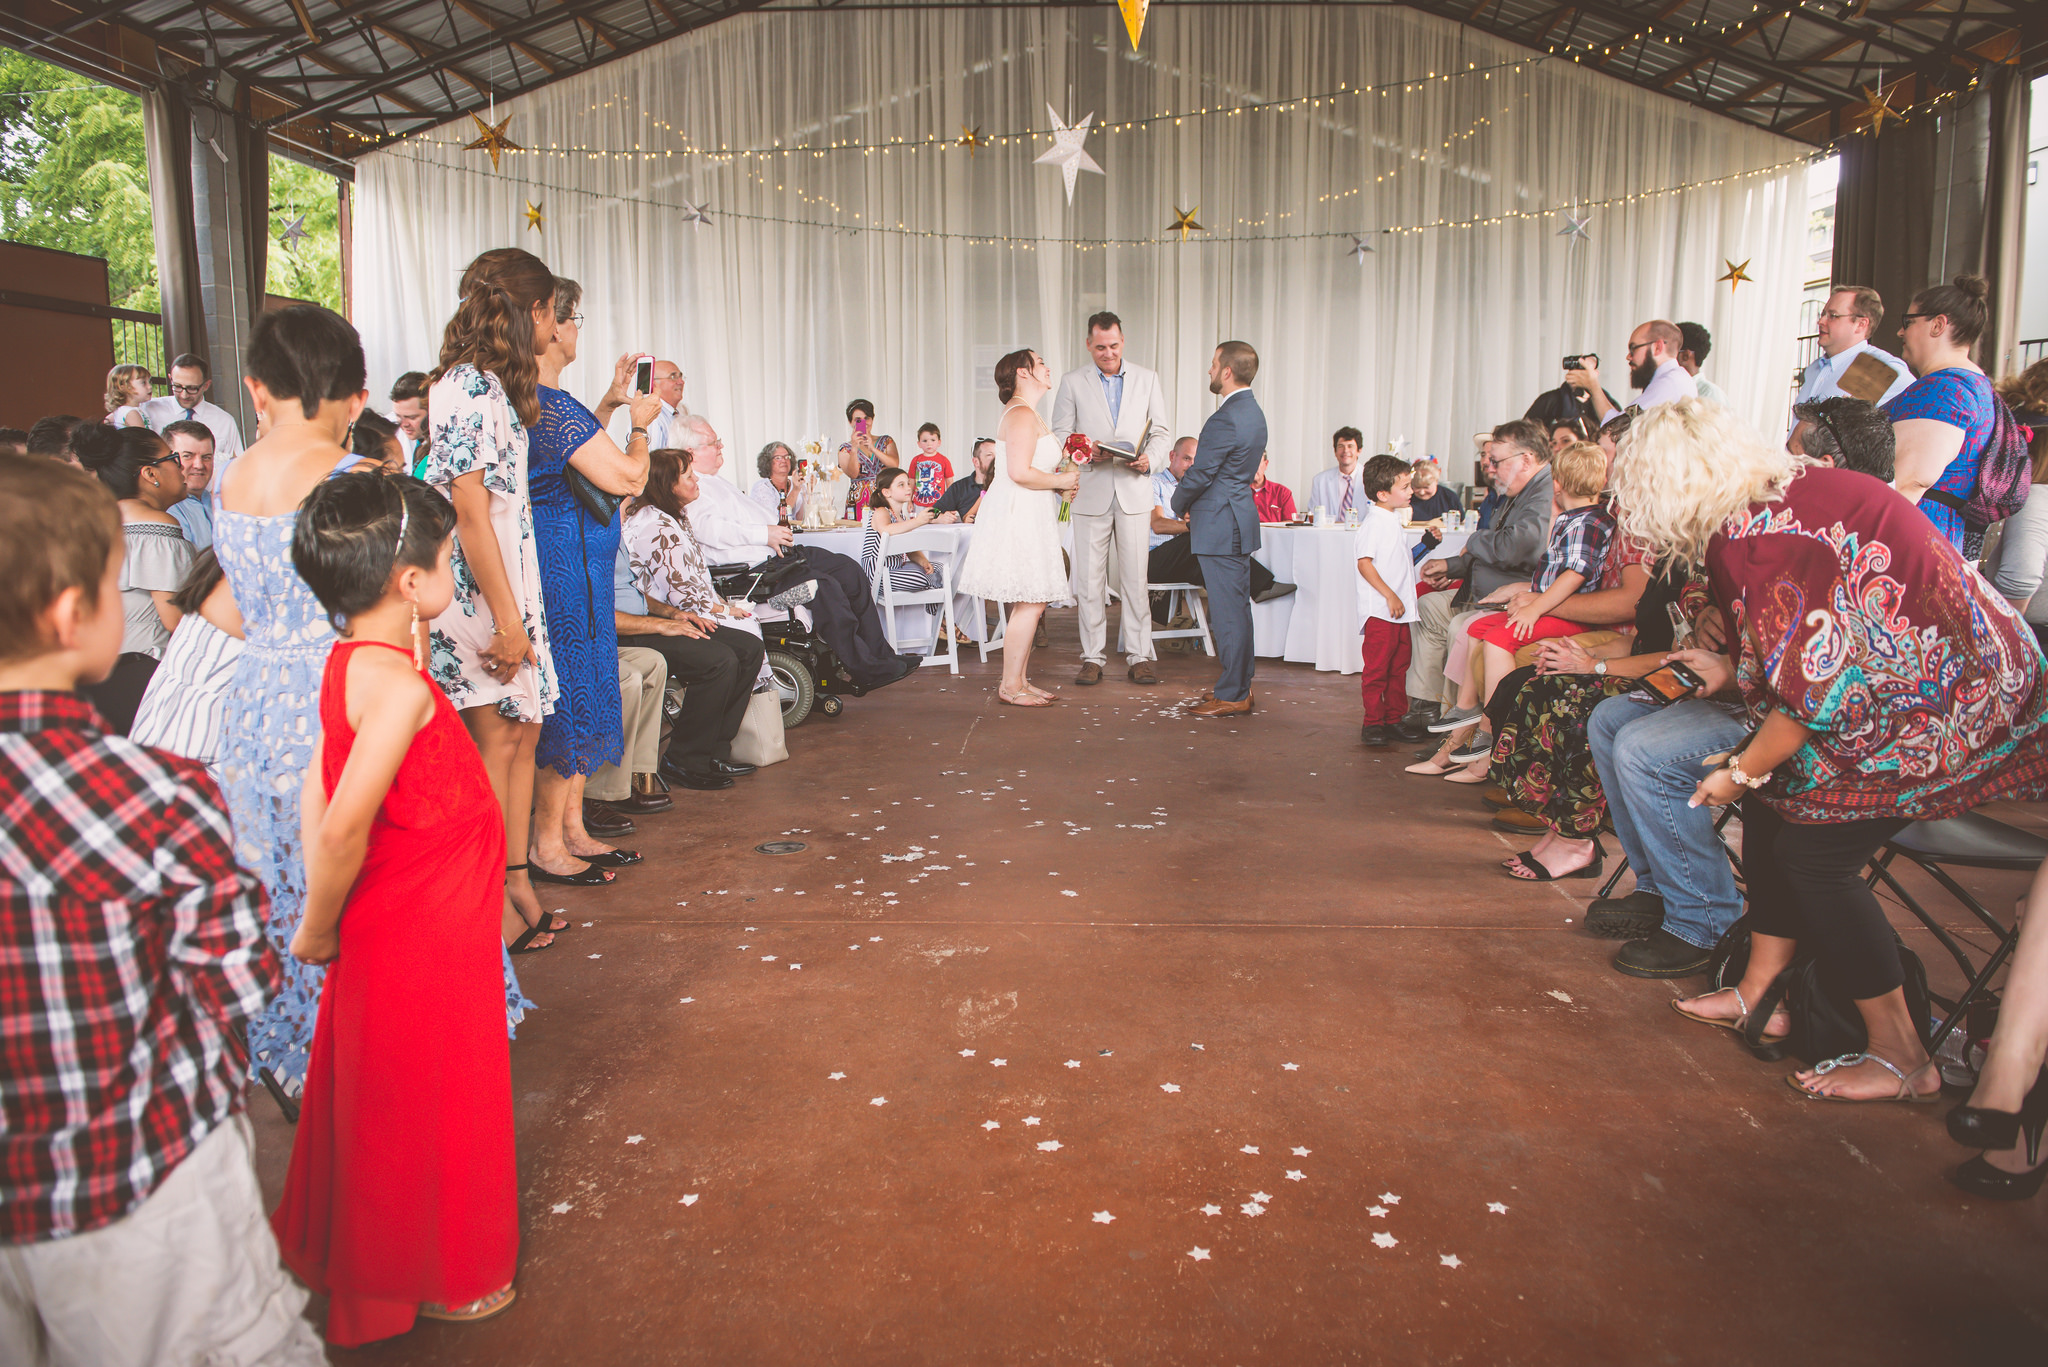
My husband and I are not fancy or traditional people. He is a goofball and my tastes are all over the place but don’t even begin to approach highfalutin. We knew we were having a July 4 wedding, and we chose an outdoor — but covered — venue. We wanted to have a big party and feed everyone good food and top it off with free drinks. We wanted revelry and a celebration of love that was essentially a big Fourth of July cookout with a wedding thrown in.
For this reason I knew I wanted a less formal approach to the whole affair — invitations, other printed collateral, decorations, ceremony. I just wanted something eclectic and fun, something that would make its own sense once it was pulled all together.
Invitations and programs
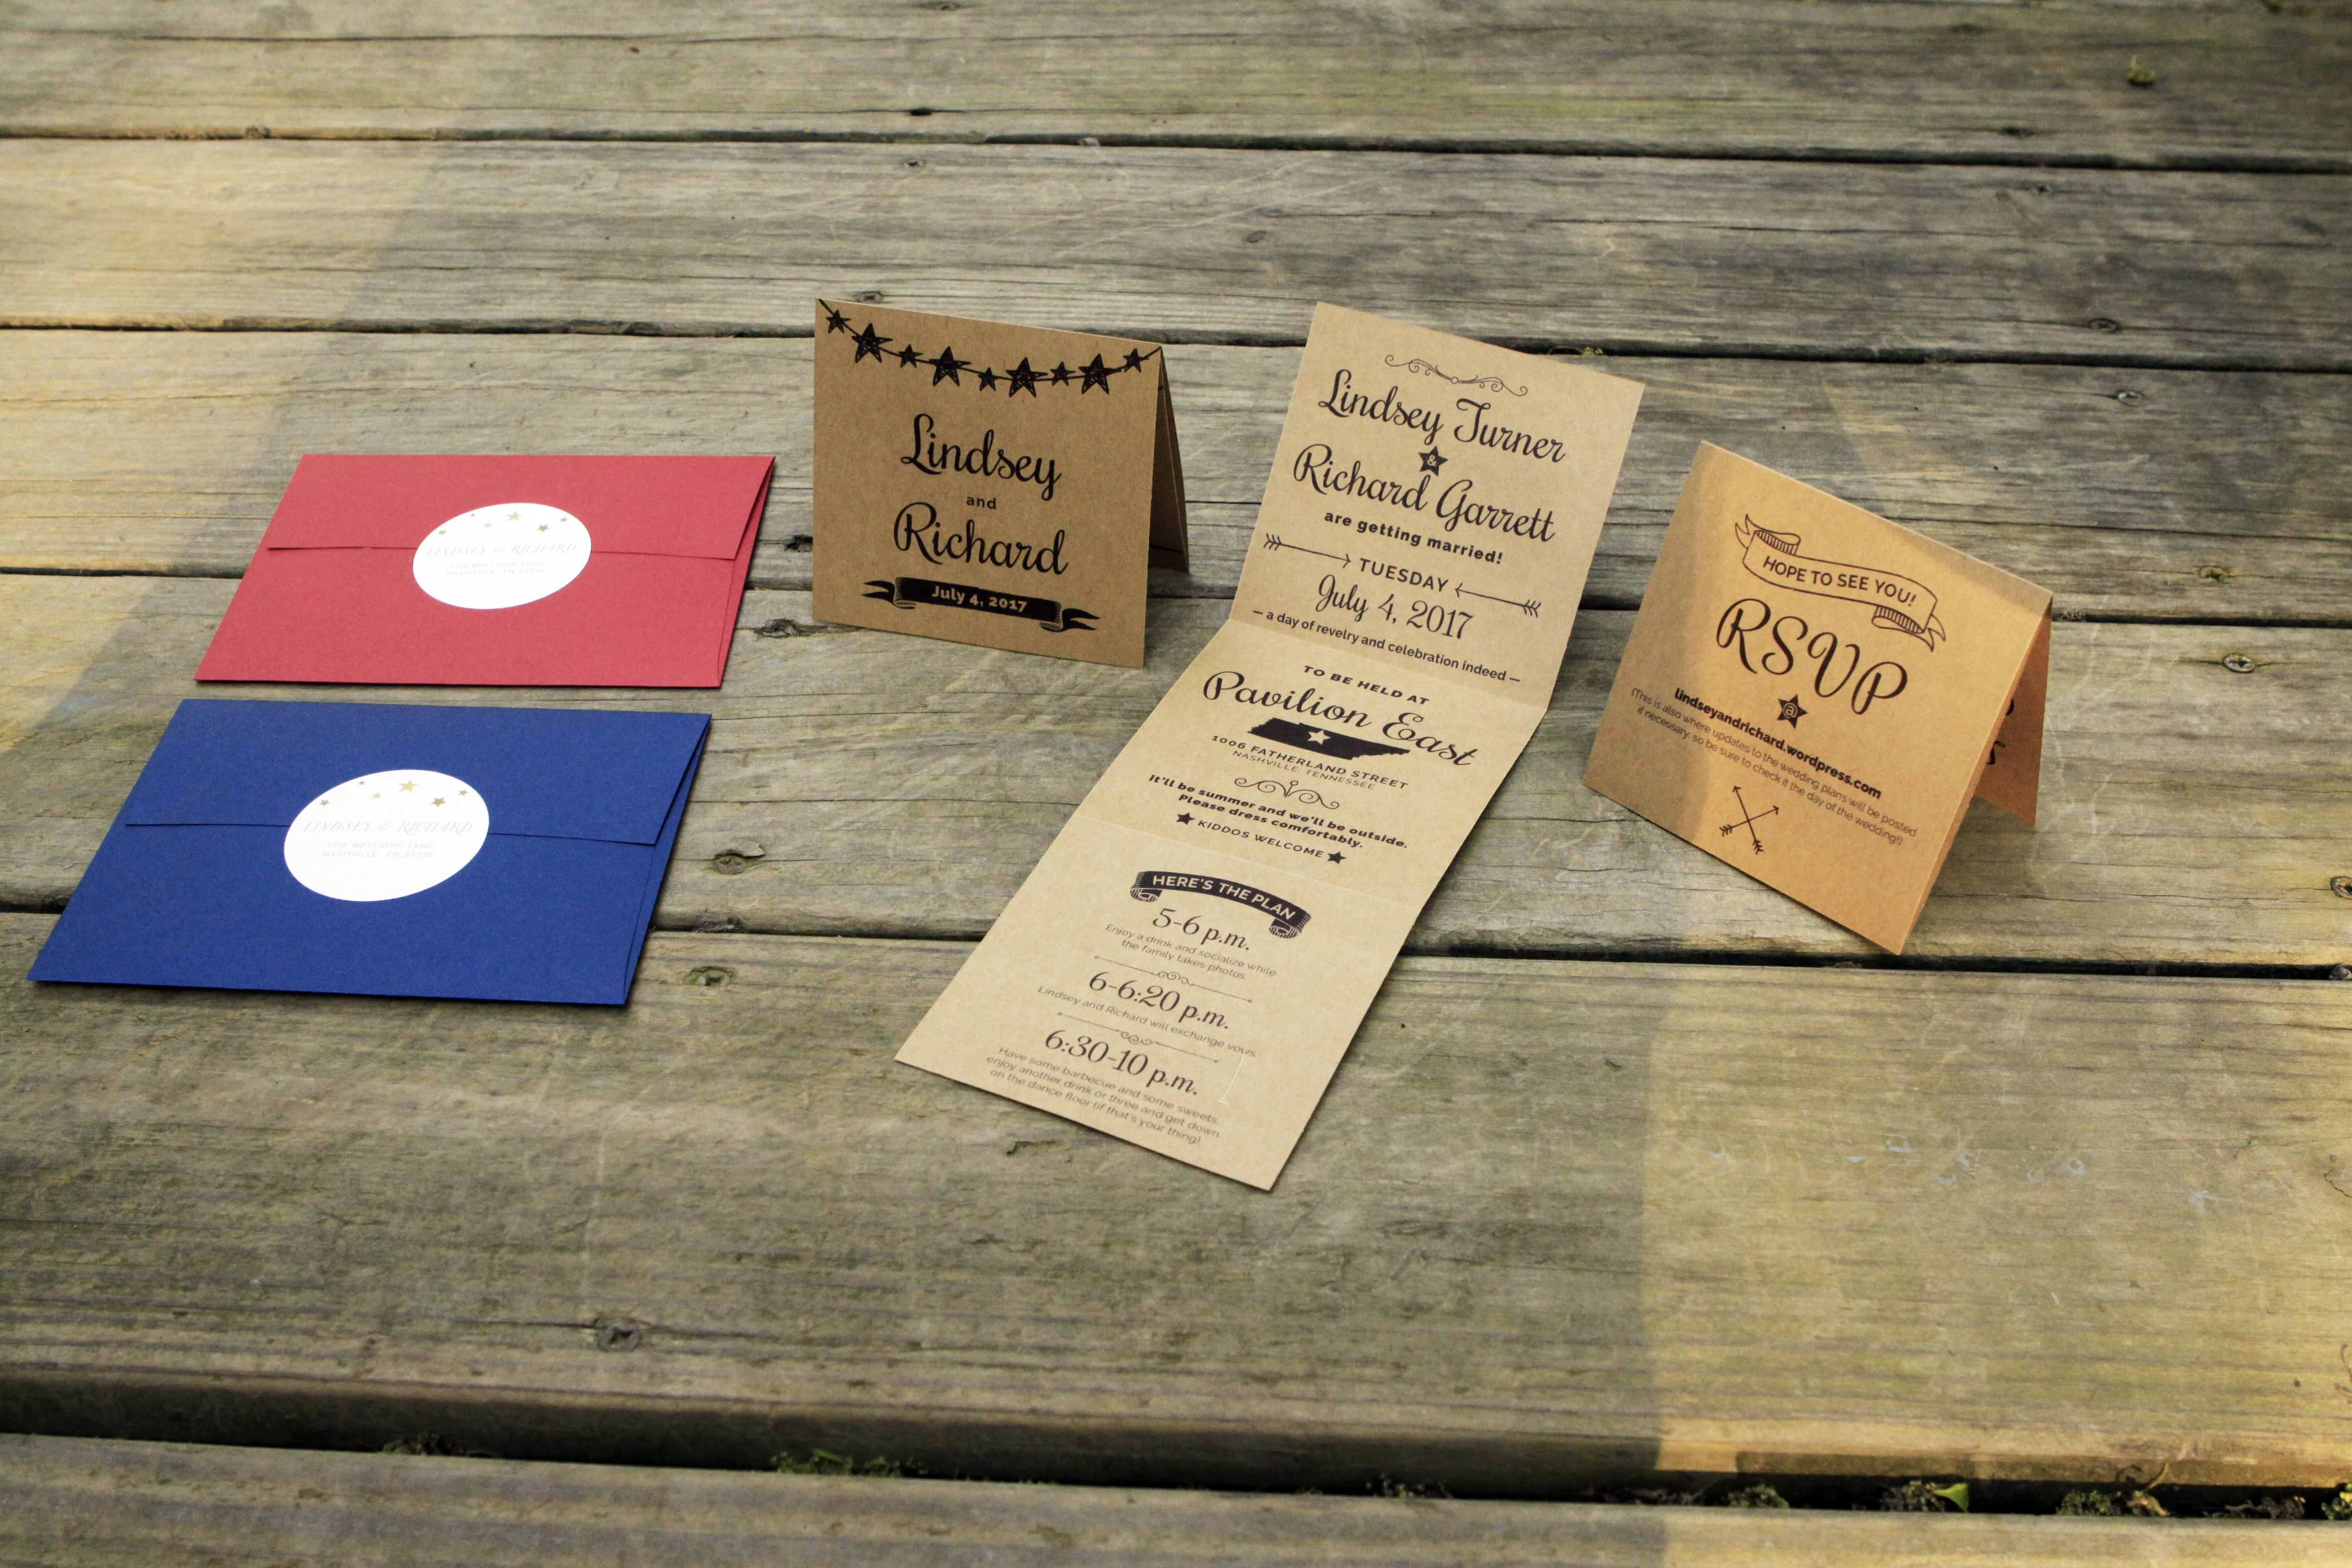
The idea for the invitations and signage took shape alongside the decor, so it’s hard to put one before the other in this post. I wanted something eclectic and simple that I could design and print at home to keep costs down. Because we were having a Fourth of July wedding, I waffled between going all out with the star spangledness or doing something more subtle with simple nods to the holiday. Ultimately for the invitations, knowing the limitations of printing and cutting and folding and mailing 250 copies myself, I opted to skew more subtle and stick with black ink only.
I did some snooping online for inspiration and found some cute rustic tri-fold invitations that I leaned heavily on, while adding my own touches and wording. I loved the idea of using recycled kraft paper and getting two invitations out of each piece of paper, each folding into a cute little square that I could mail. I set up a website so I could point people to it for their RSVPs, ordered both navy and red envelopes, and some cute star-themed return address labels from Bohtieque.

The invitations printed out two to a page, and I had to flip the stack over and feed back through the printer to print the back. Then I used my paper cutter to cut them apart, and I used an X-acto knife to score the places where they needed to fold cleanly. Then I went back through and folded. Then stuffed into the envelopes, wrote the addresses, closed and applied the return labels.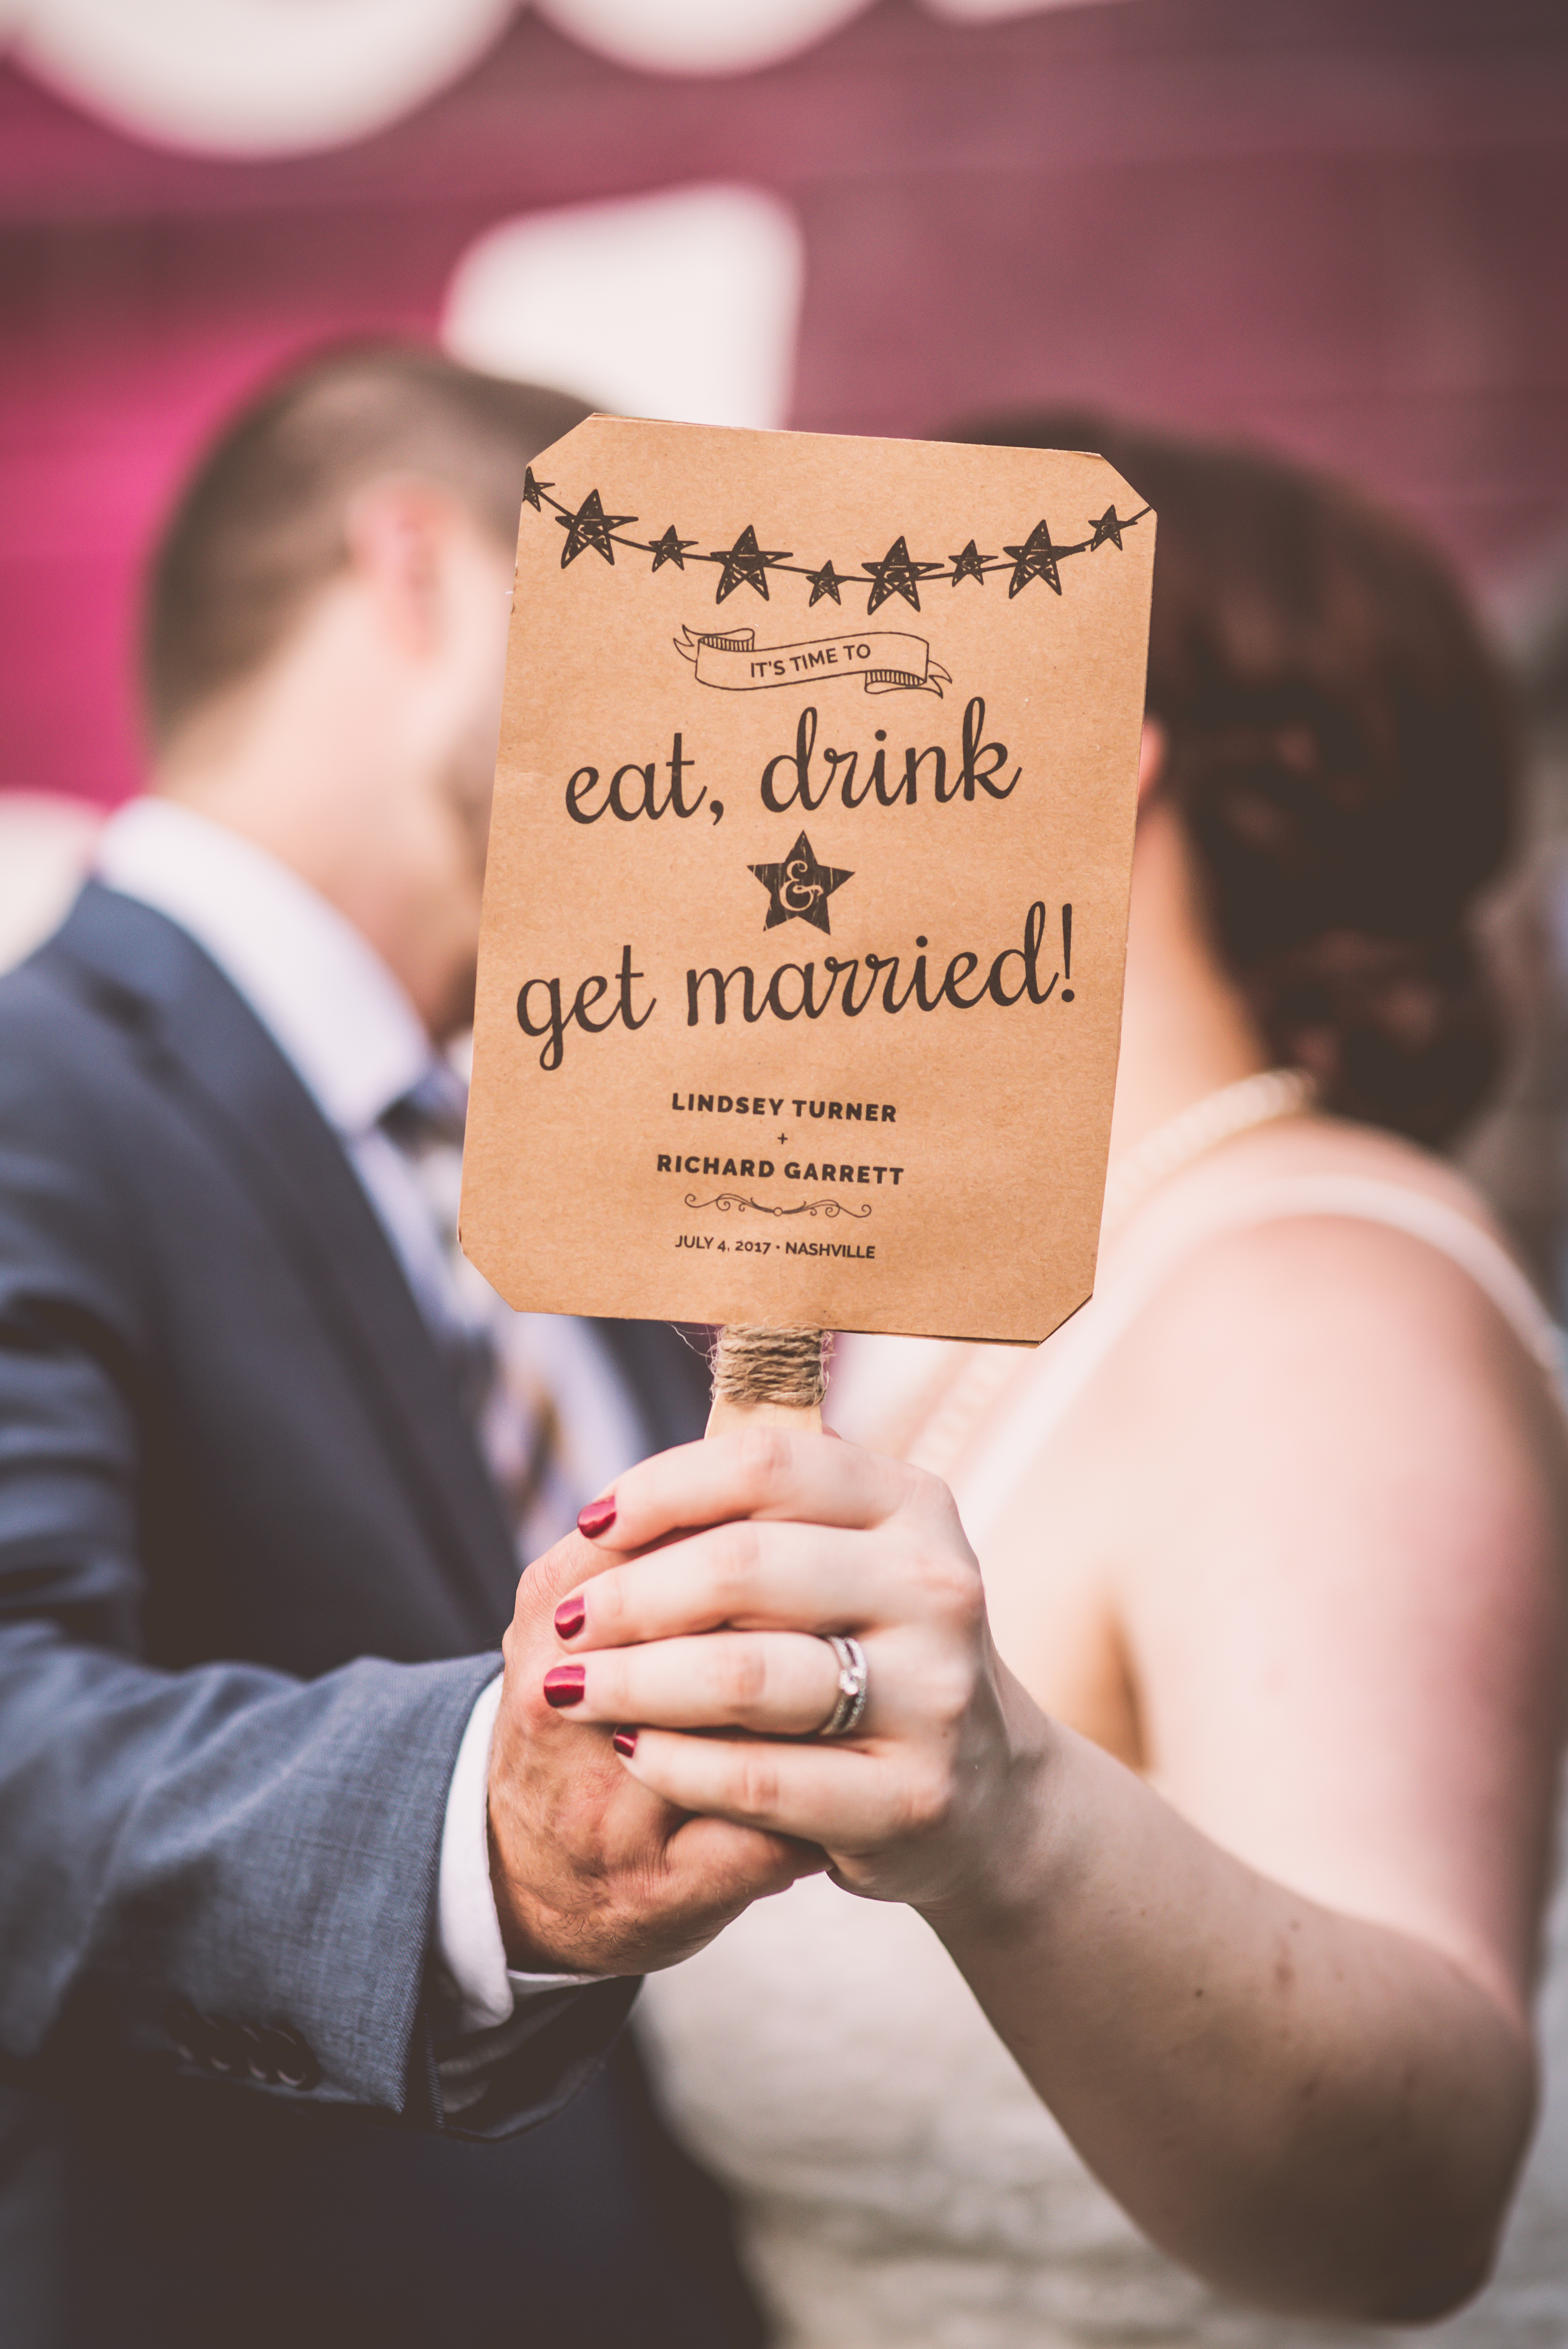
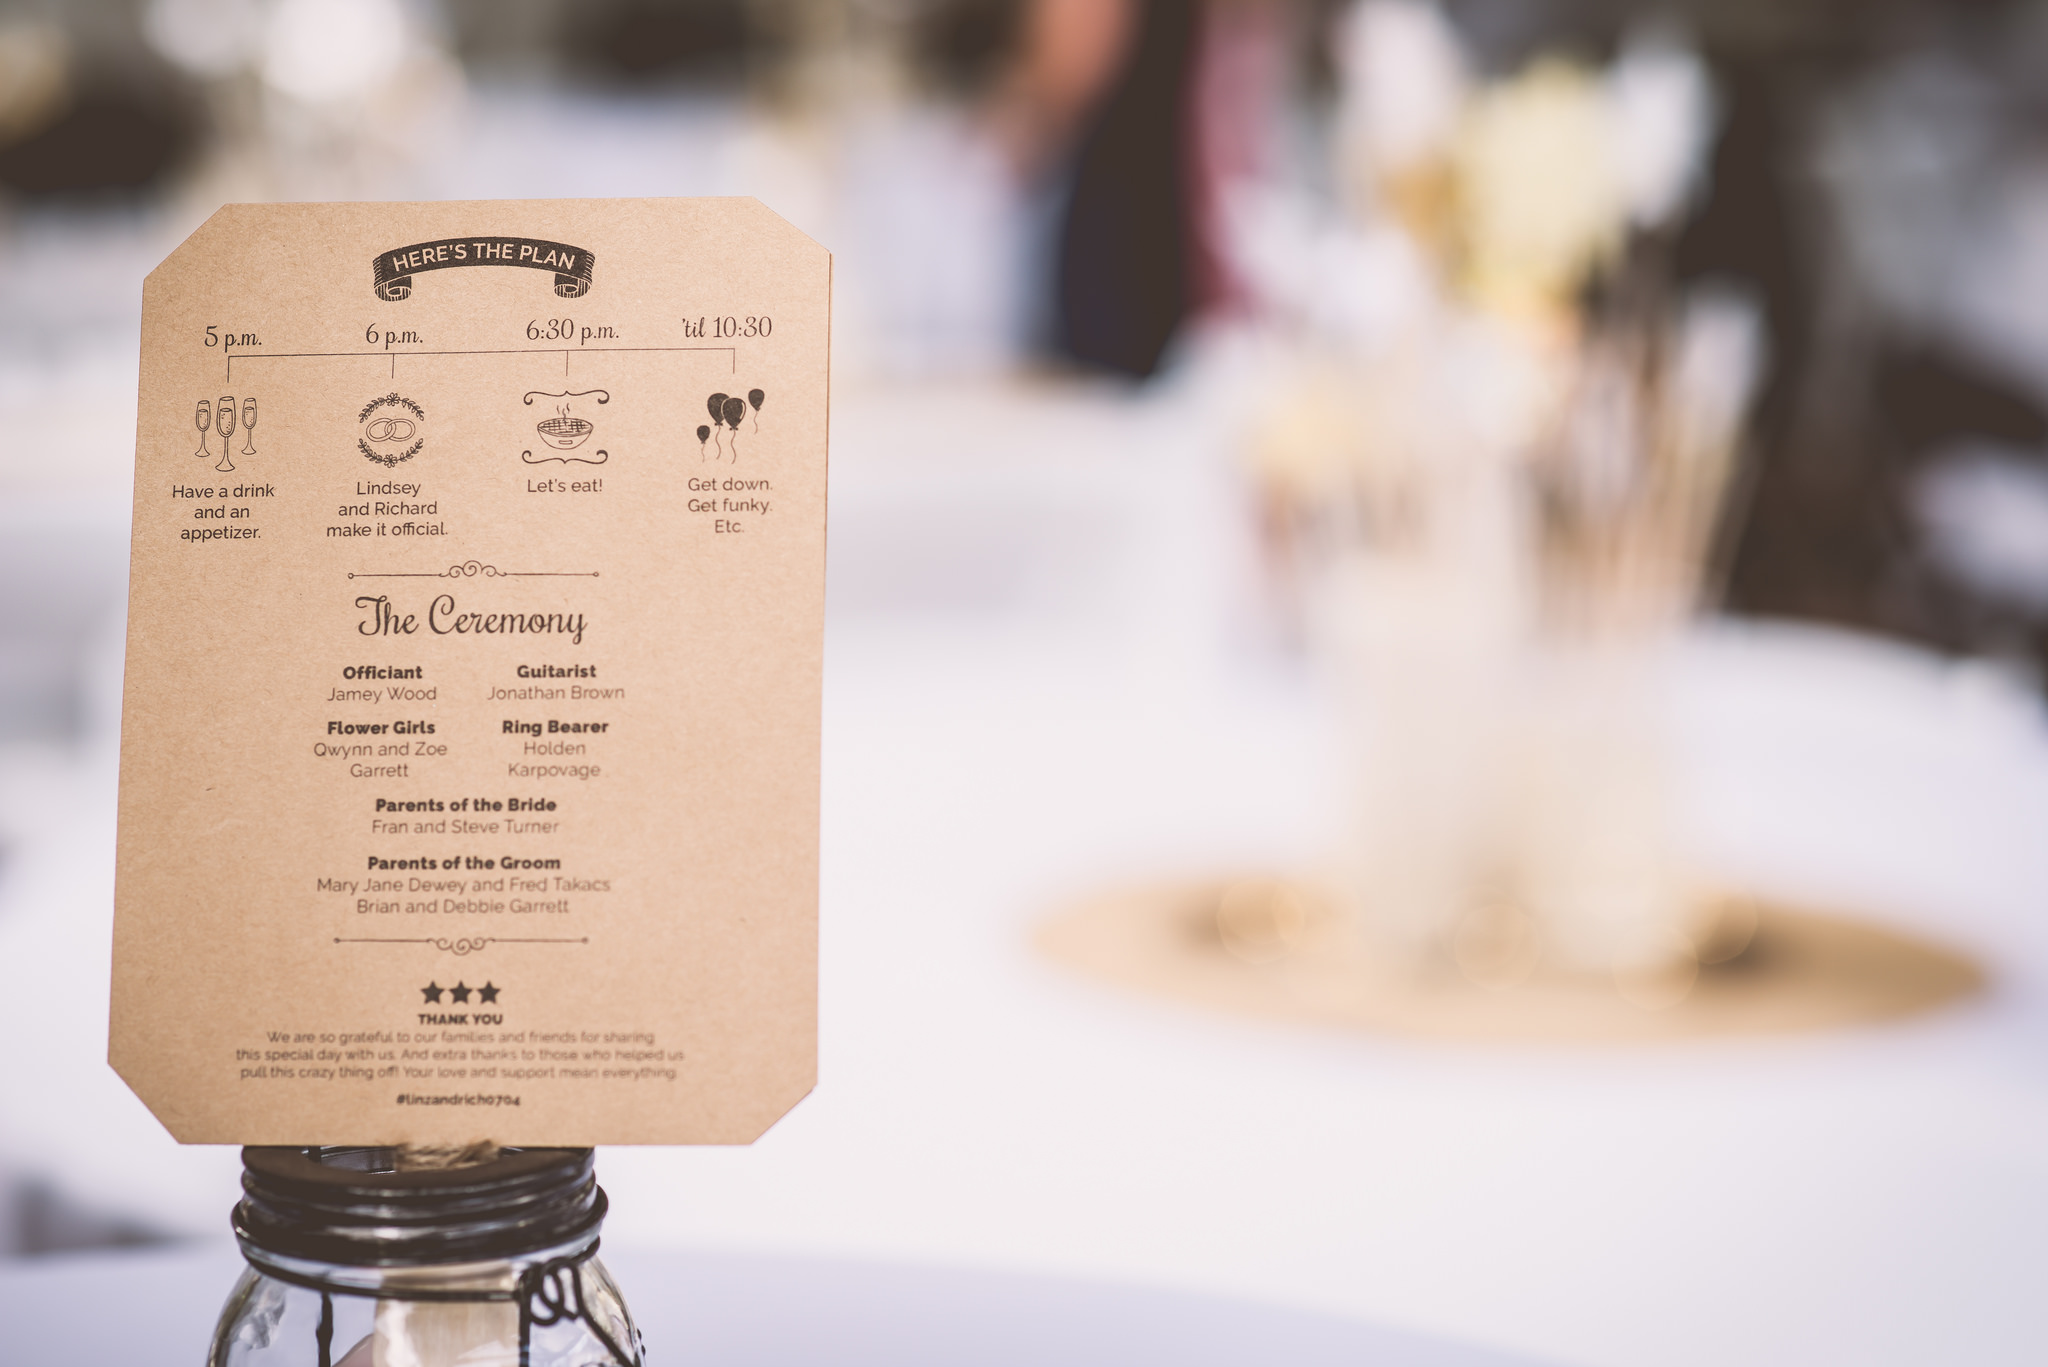 I carried the same style over to the programs, which doubled as fans since I knew it would be HOT. On the back side, I made a miniature timeline of events and listed the officiant, guitar player, family, and a big thank you to our friends and family.
 I was able to design the page so that I could get two fan fronts or two fan backs per page. Once printed, I cut them apart and nicked off the corners. Once I had a front and a back ready to go, I paired them with a wooden handle (bought off Etsy) and secured with hot glue. I wrapped a small length of twine around the base of the handle as an accent.
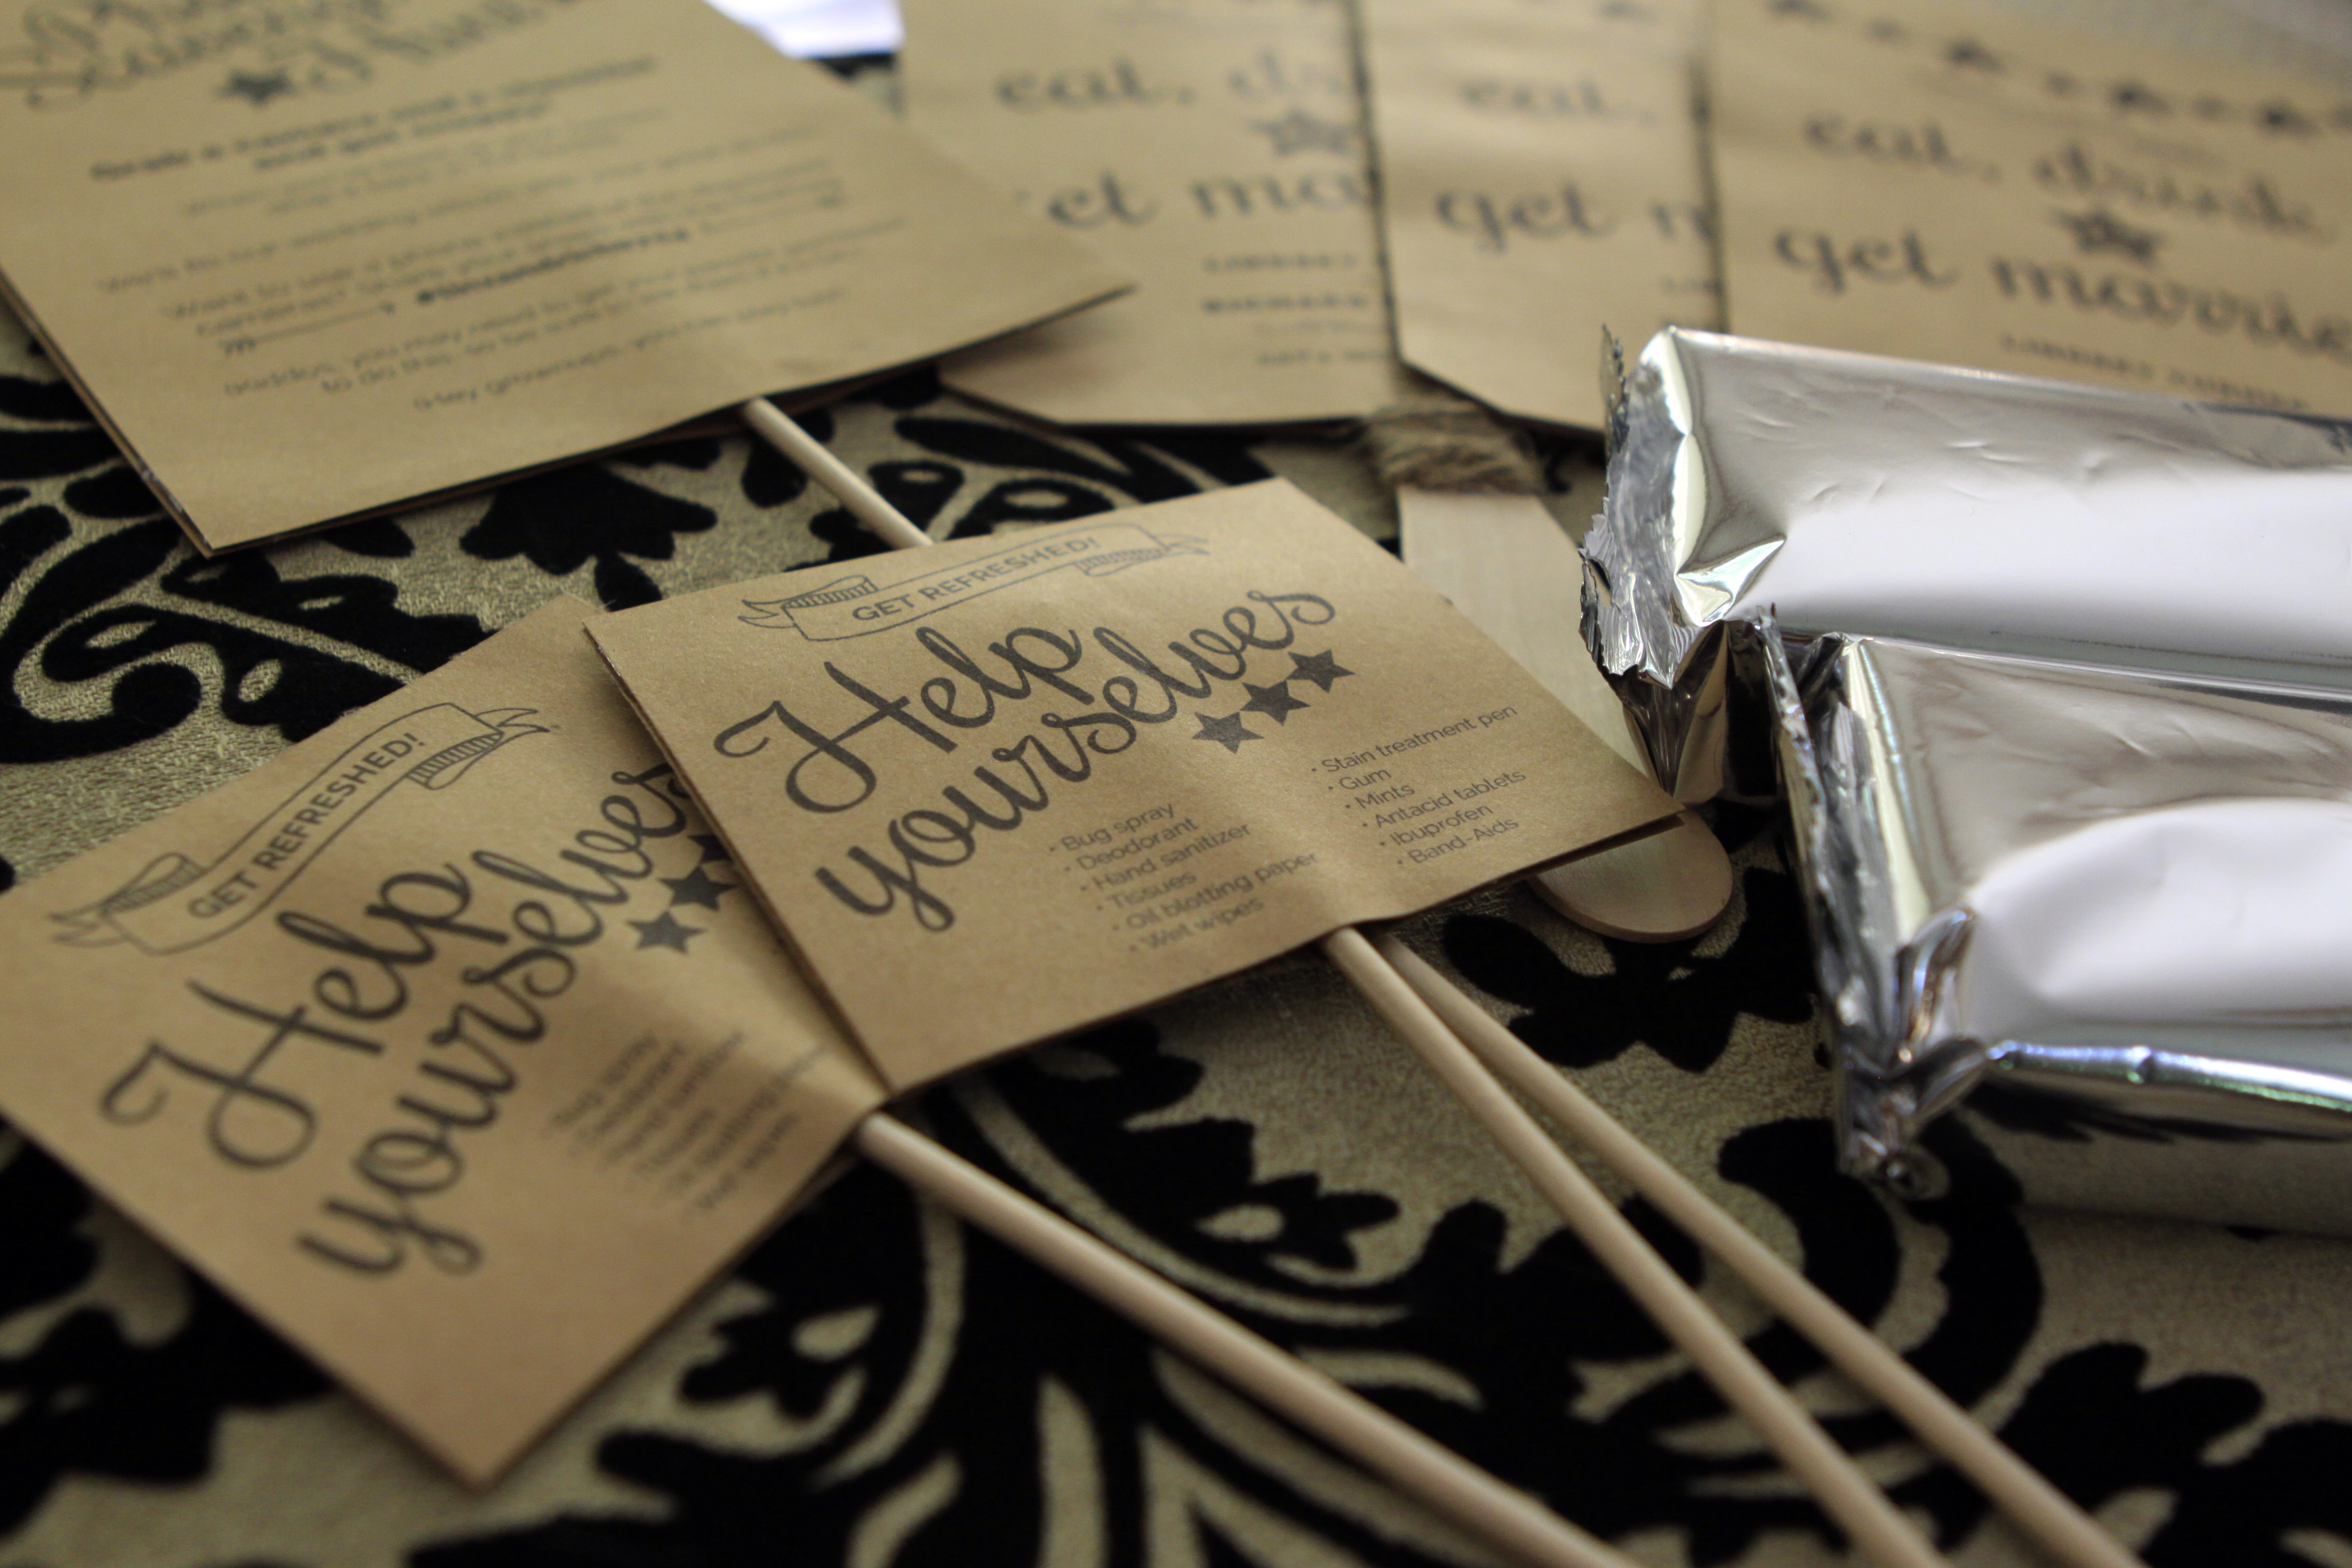
I made several other signs in the same style — bathroom signs (star-shaped and placed on glitter-paper backgrounds), signs for the toiletries baskets, signs for the welcome table, signs for the kids’ and accent tables, signs for the photo scavenger hunt, bar menu, sign for the tip jar at the bar, and more. I’m happy with the way they all work together, and how consistent they all feel as a unit.
Decorations
When we chose a budget-conscious outdoor Fourth of July wedding, one of the first things I decided was that I did not want to bother with having many flowers. Flower centerpieces can be expensive and the flowers would have struggled in extreme heat. I wanted to go in a different direction and do something a little unconventional, something I had never seen before. Something I could do entirely myself.
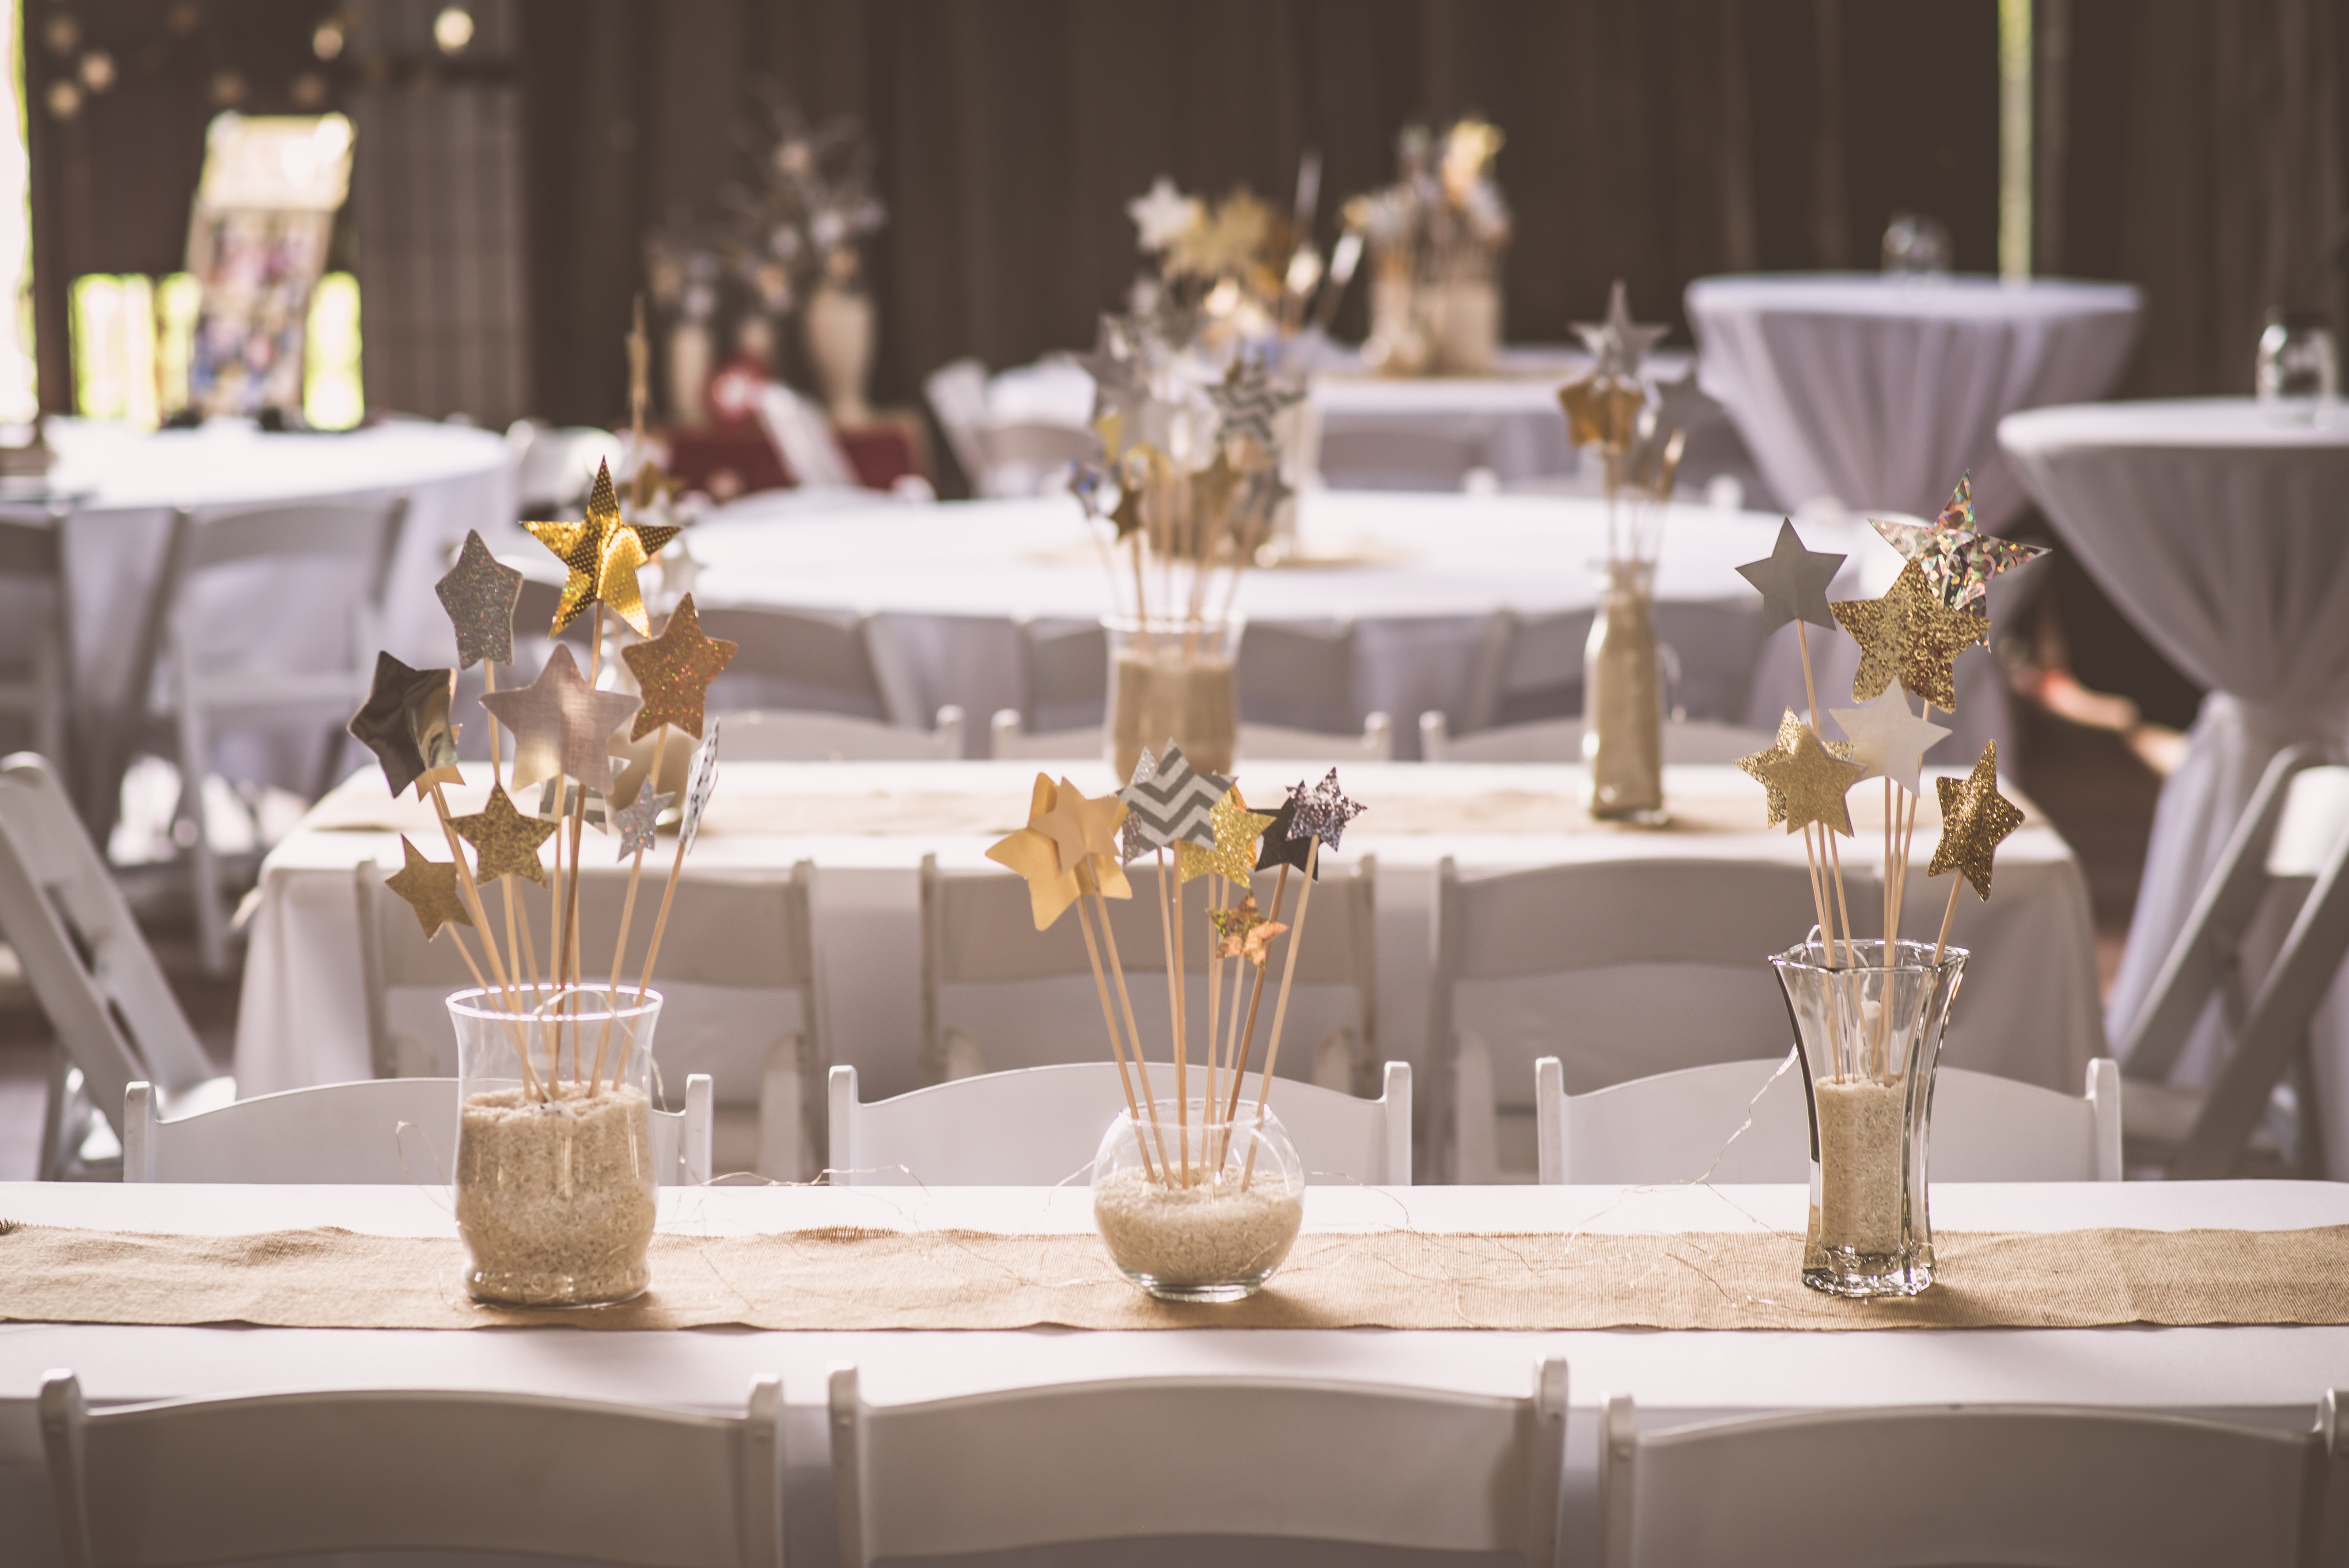
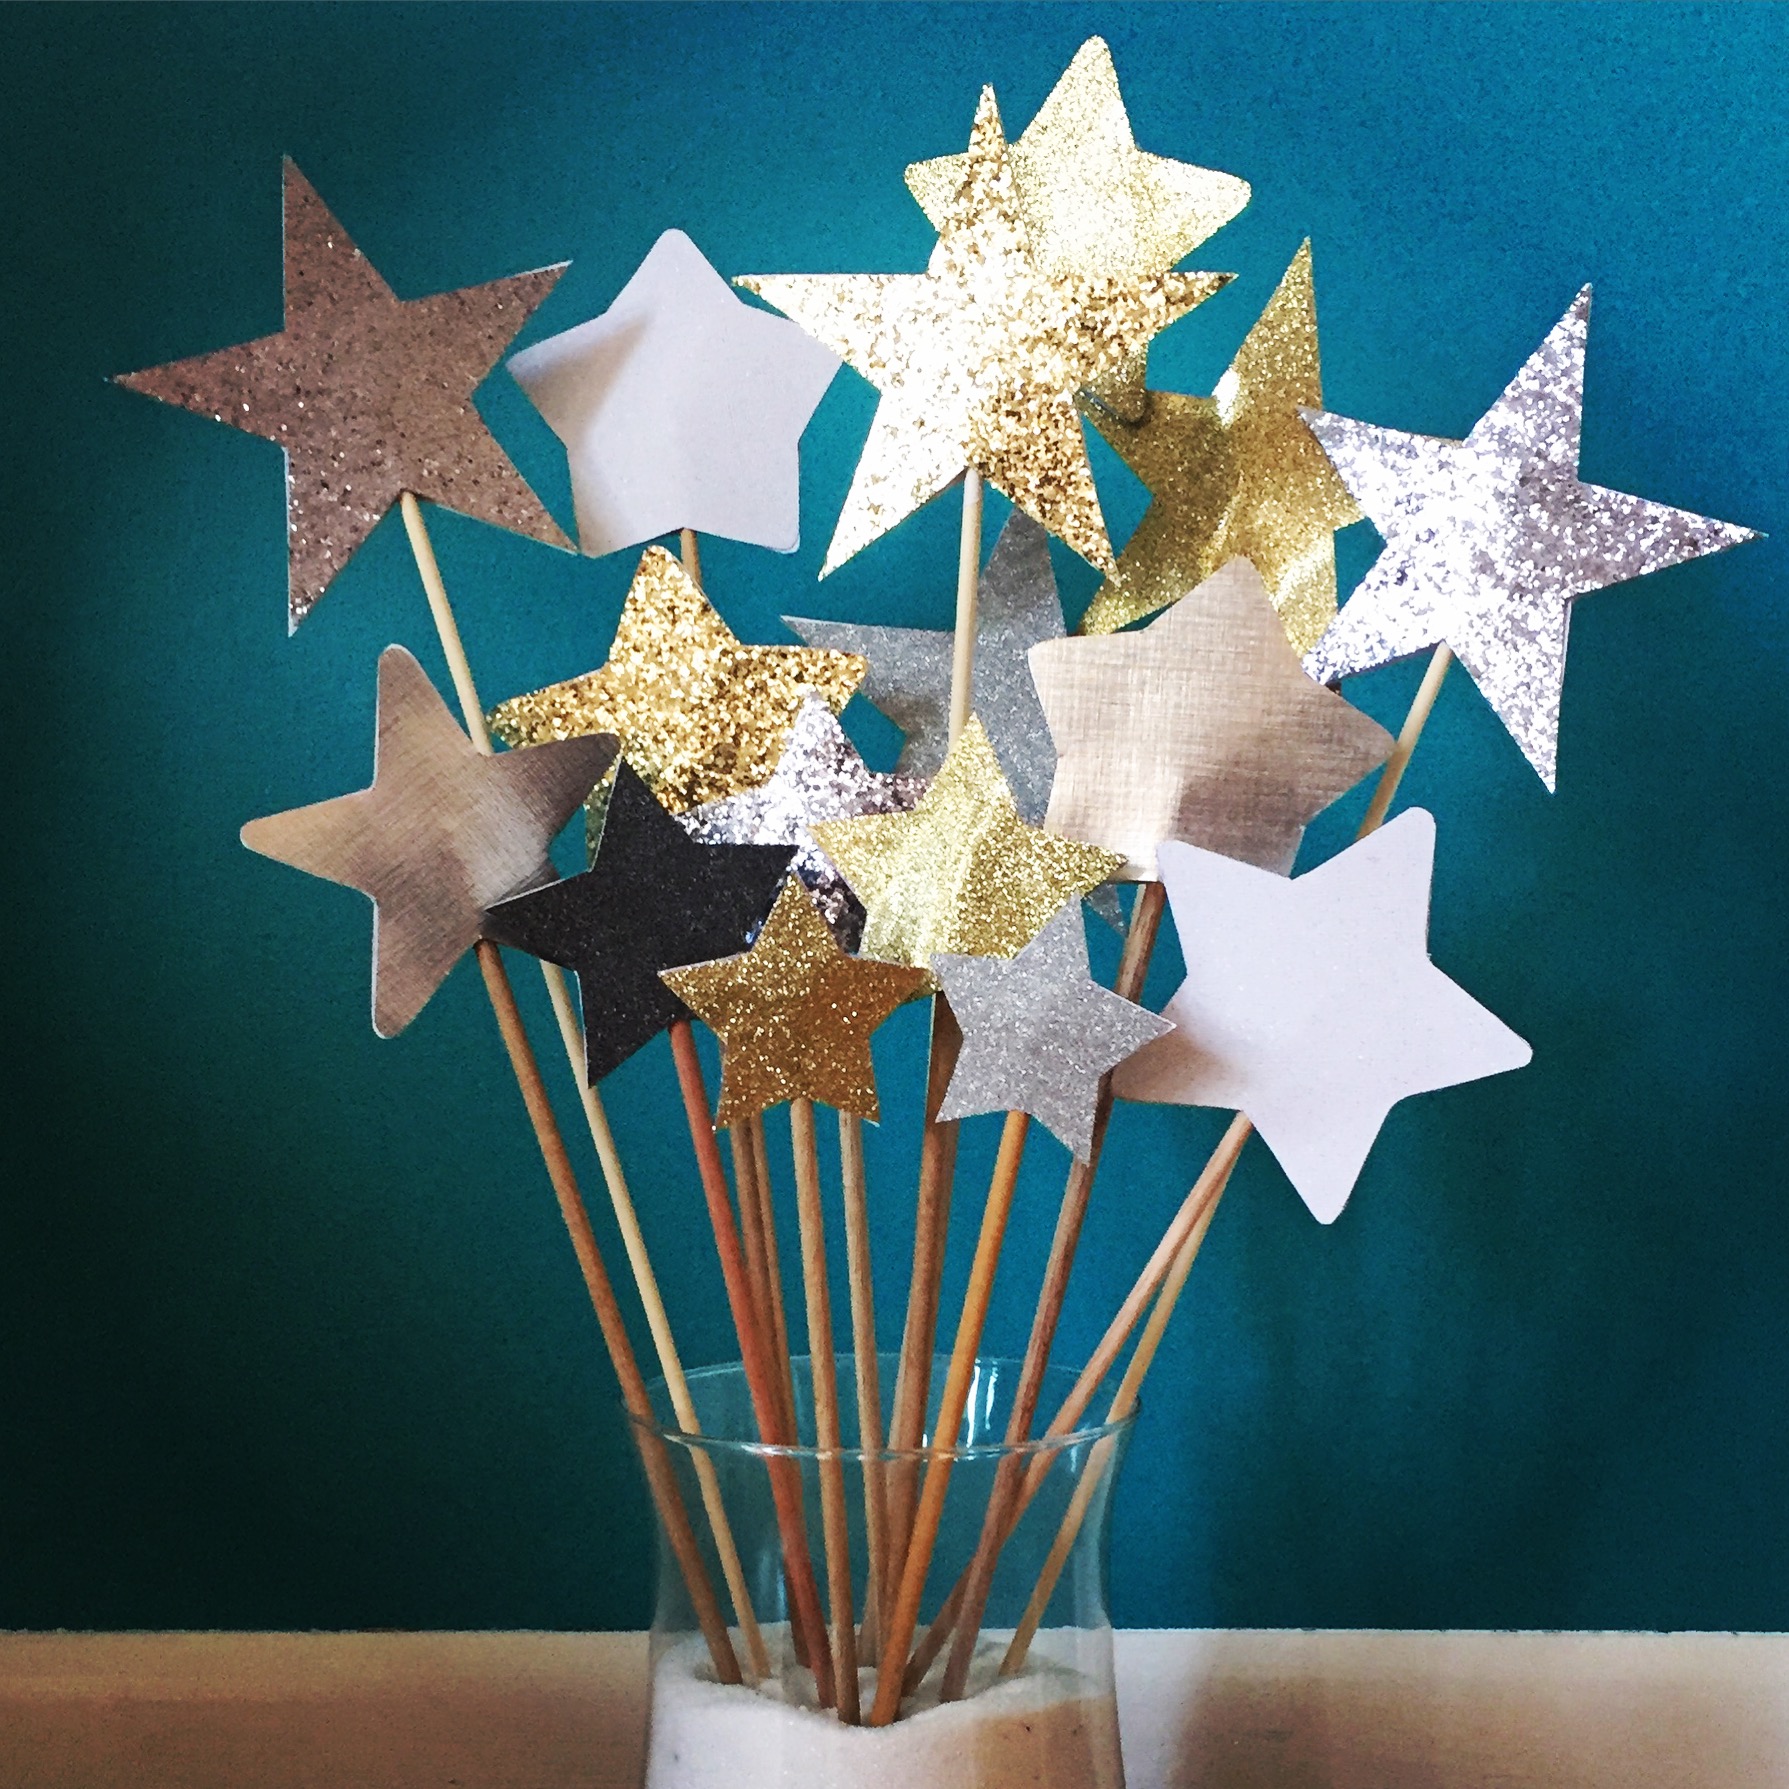 I spent a fair amount of time gathering ideas on Pinterest, and this little star-spangled cake topper that I pinned got me to thinking: What if I can do that, but for a centerpiece? So I went to the craft store and bought wooden dowels and fancy gold and silver cardstock, and made a handful of star wands that I arranged in a vase. I loved it instantly, and knew the direction I wanted to go in. When my then-fiancé came home and saw it, he thought it was cool too. Over the next few months, I bought so much glittery cardstock and so many wooden dowels and hot glue sticks. I cut out hundreds of stars and made more than 300 star wands and several strands of star garland on twine. I was covered in glitter for about four months.
When I realized how large the tables were going to be, I realized it was going to make more sense to have multiple star clusters on each table. And in keeping with the whole DIY/eclectic feel, I wanted the vases to be mixed in style and size. So we utilized Goodwill and other thrifty outlets to stock up on tons of clear vases. At the time I was thinking we’d fill the vases with white sand, but my husband had the brilliant suggestion to use white rice, which worked great. (Incidentally, we have a ton of extra white rice stockpiled if anyone needs any.)
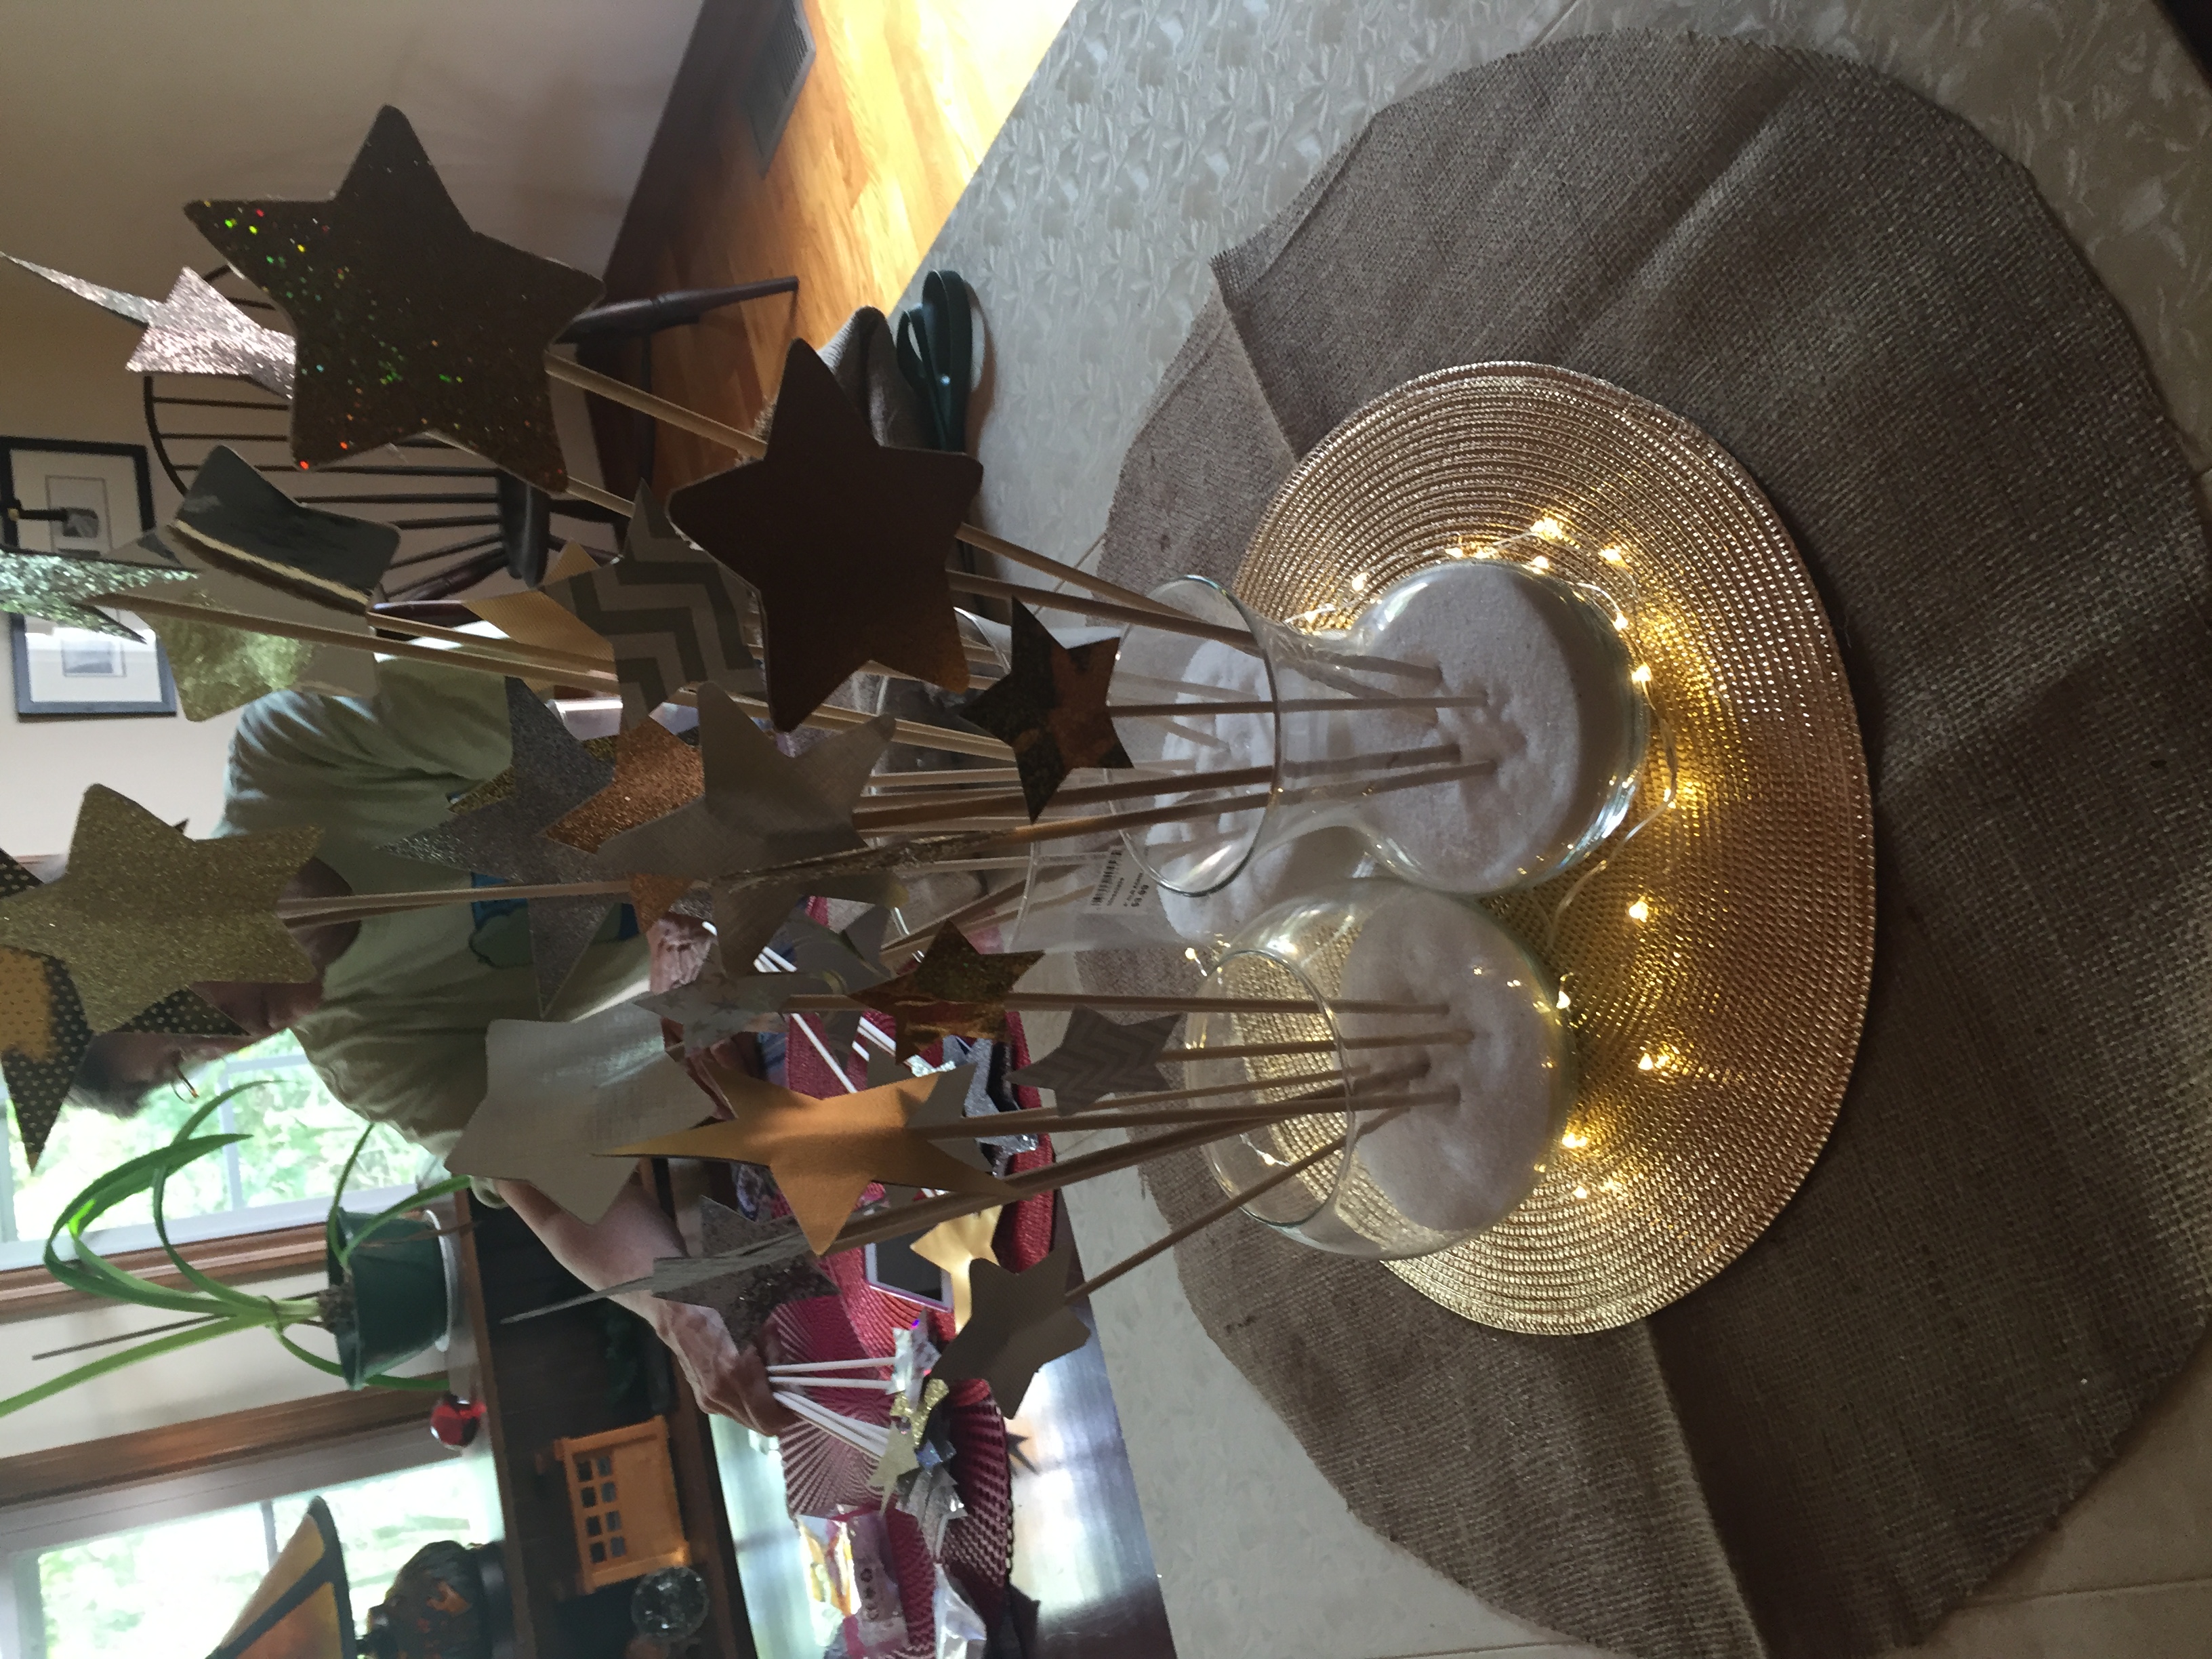 Rustic weddings are a whole thing right now, with burlap and mason jars and barn wood and such. I wasn’t trying to go all out on the rustic details but I did like some rustic accents, since it made sense in the context of a Fourth of July barbecue. So my mother-in-law cut up some burlap circles and table runners for me, and I placed some circular gold-rope placemats on top, and then arranged the vases of stars. I got these super inexpensive wire LED lights with a tiny battery pack and we wrapped around the base and hid the battery pack in the middle of the vases.
As the gold and silver and burlap/kraft brown motif emerged, I wanted to add some pops of red. I knew I didn’t want to go all out with red, white and blue, but instead do a sort of twist on it. I had a few accent tables to plan — a welcome table, the kids’ table, and a small decorative table that would feature branches where people could take little star ornaments if they wanted. Plus some elements that would be worked in toward the food area. I hunted for red and blue glass accents, and incorporated matching kraft-paper signage everywhere.

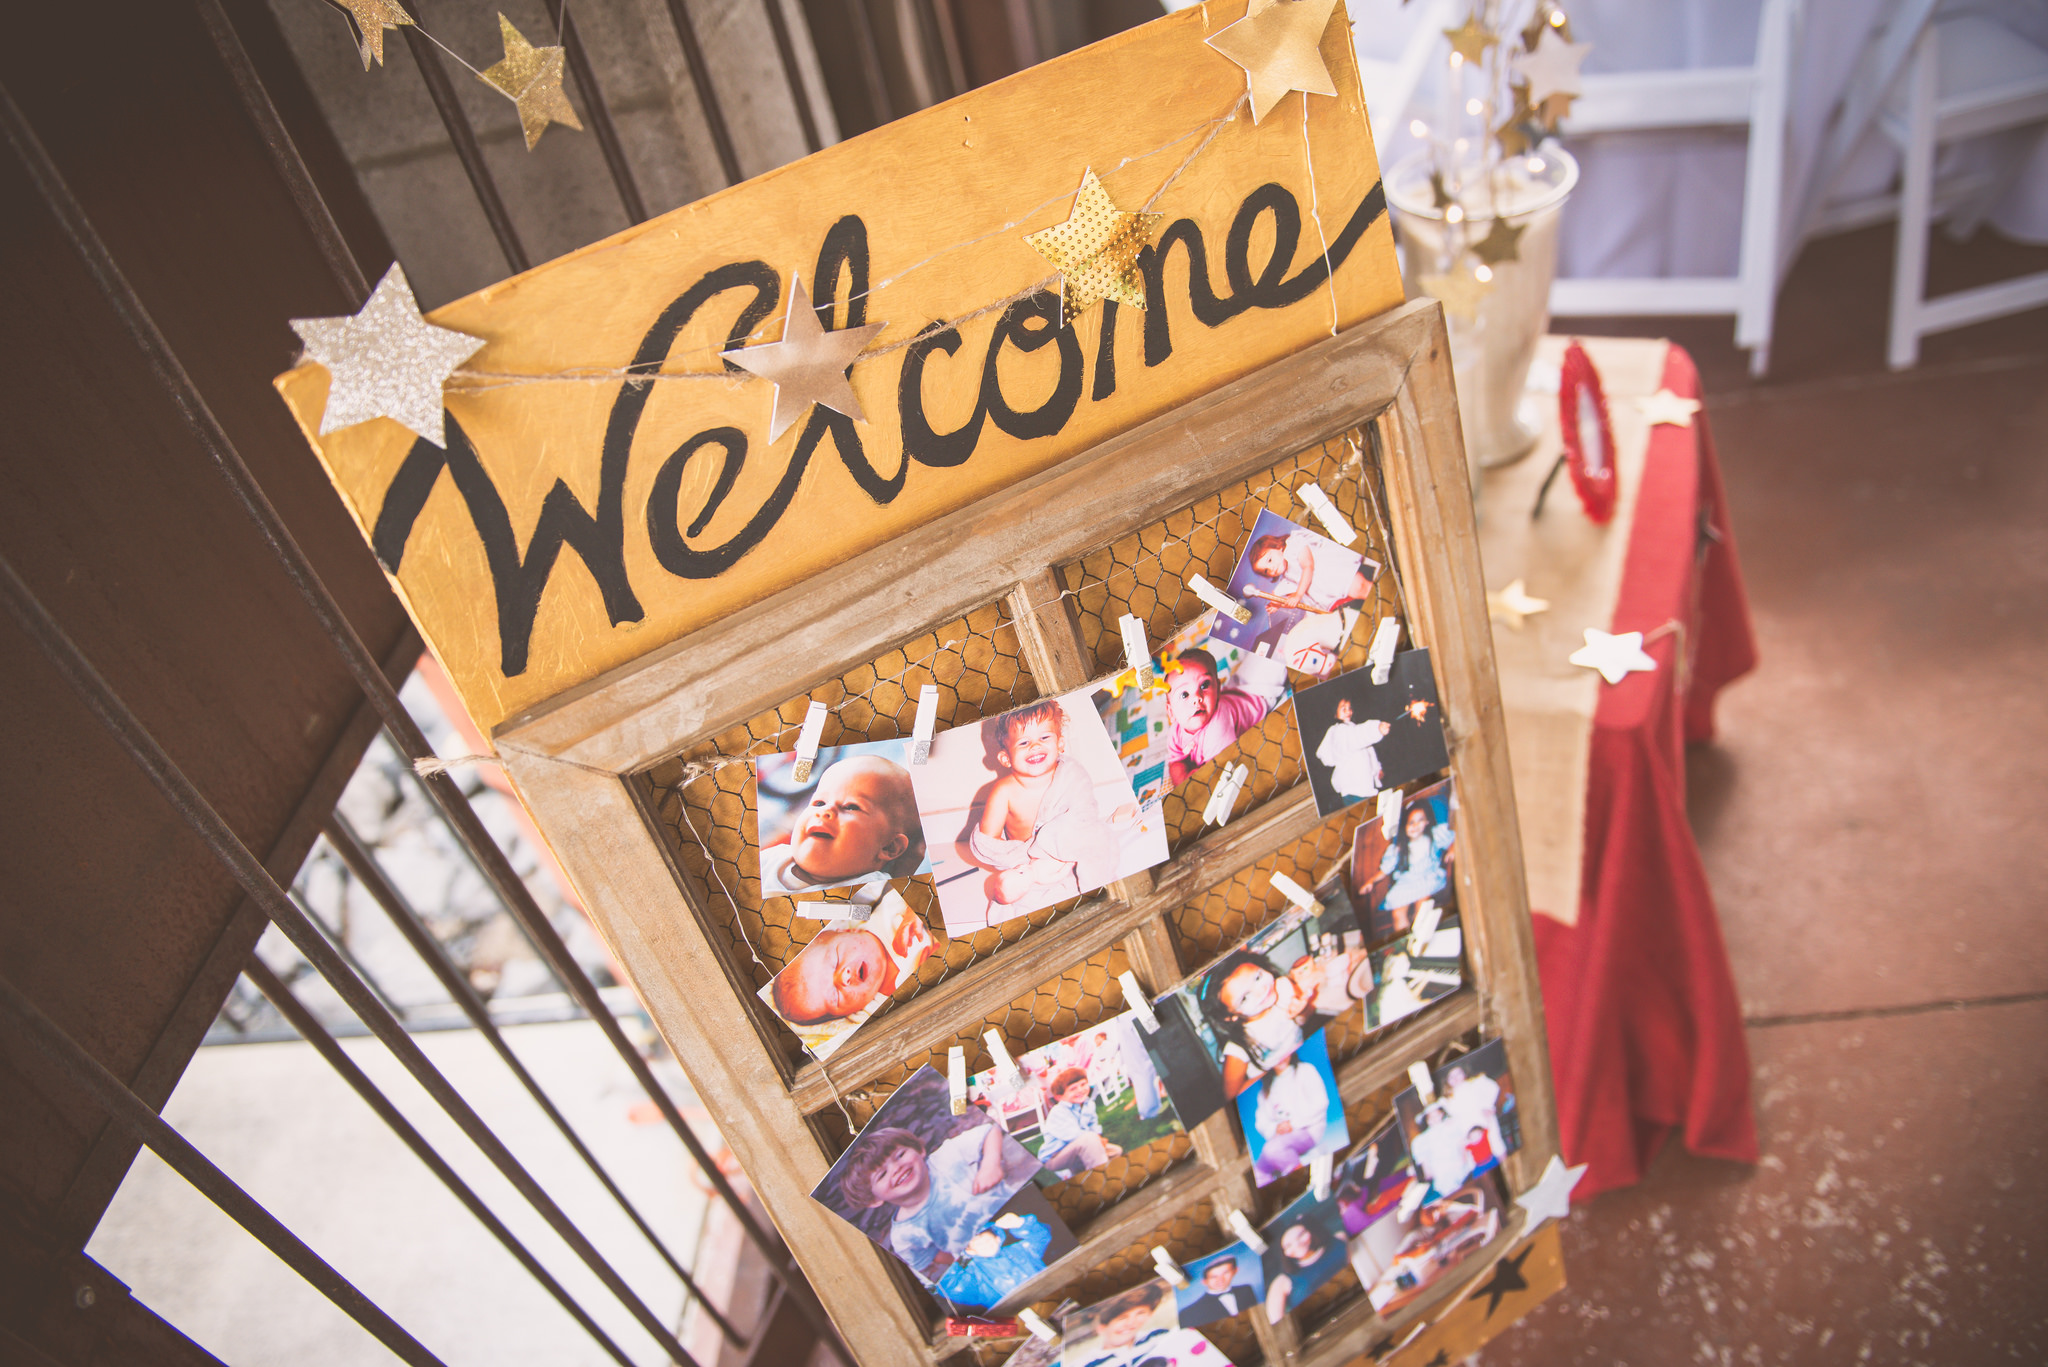
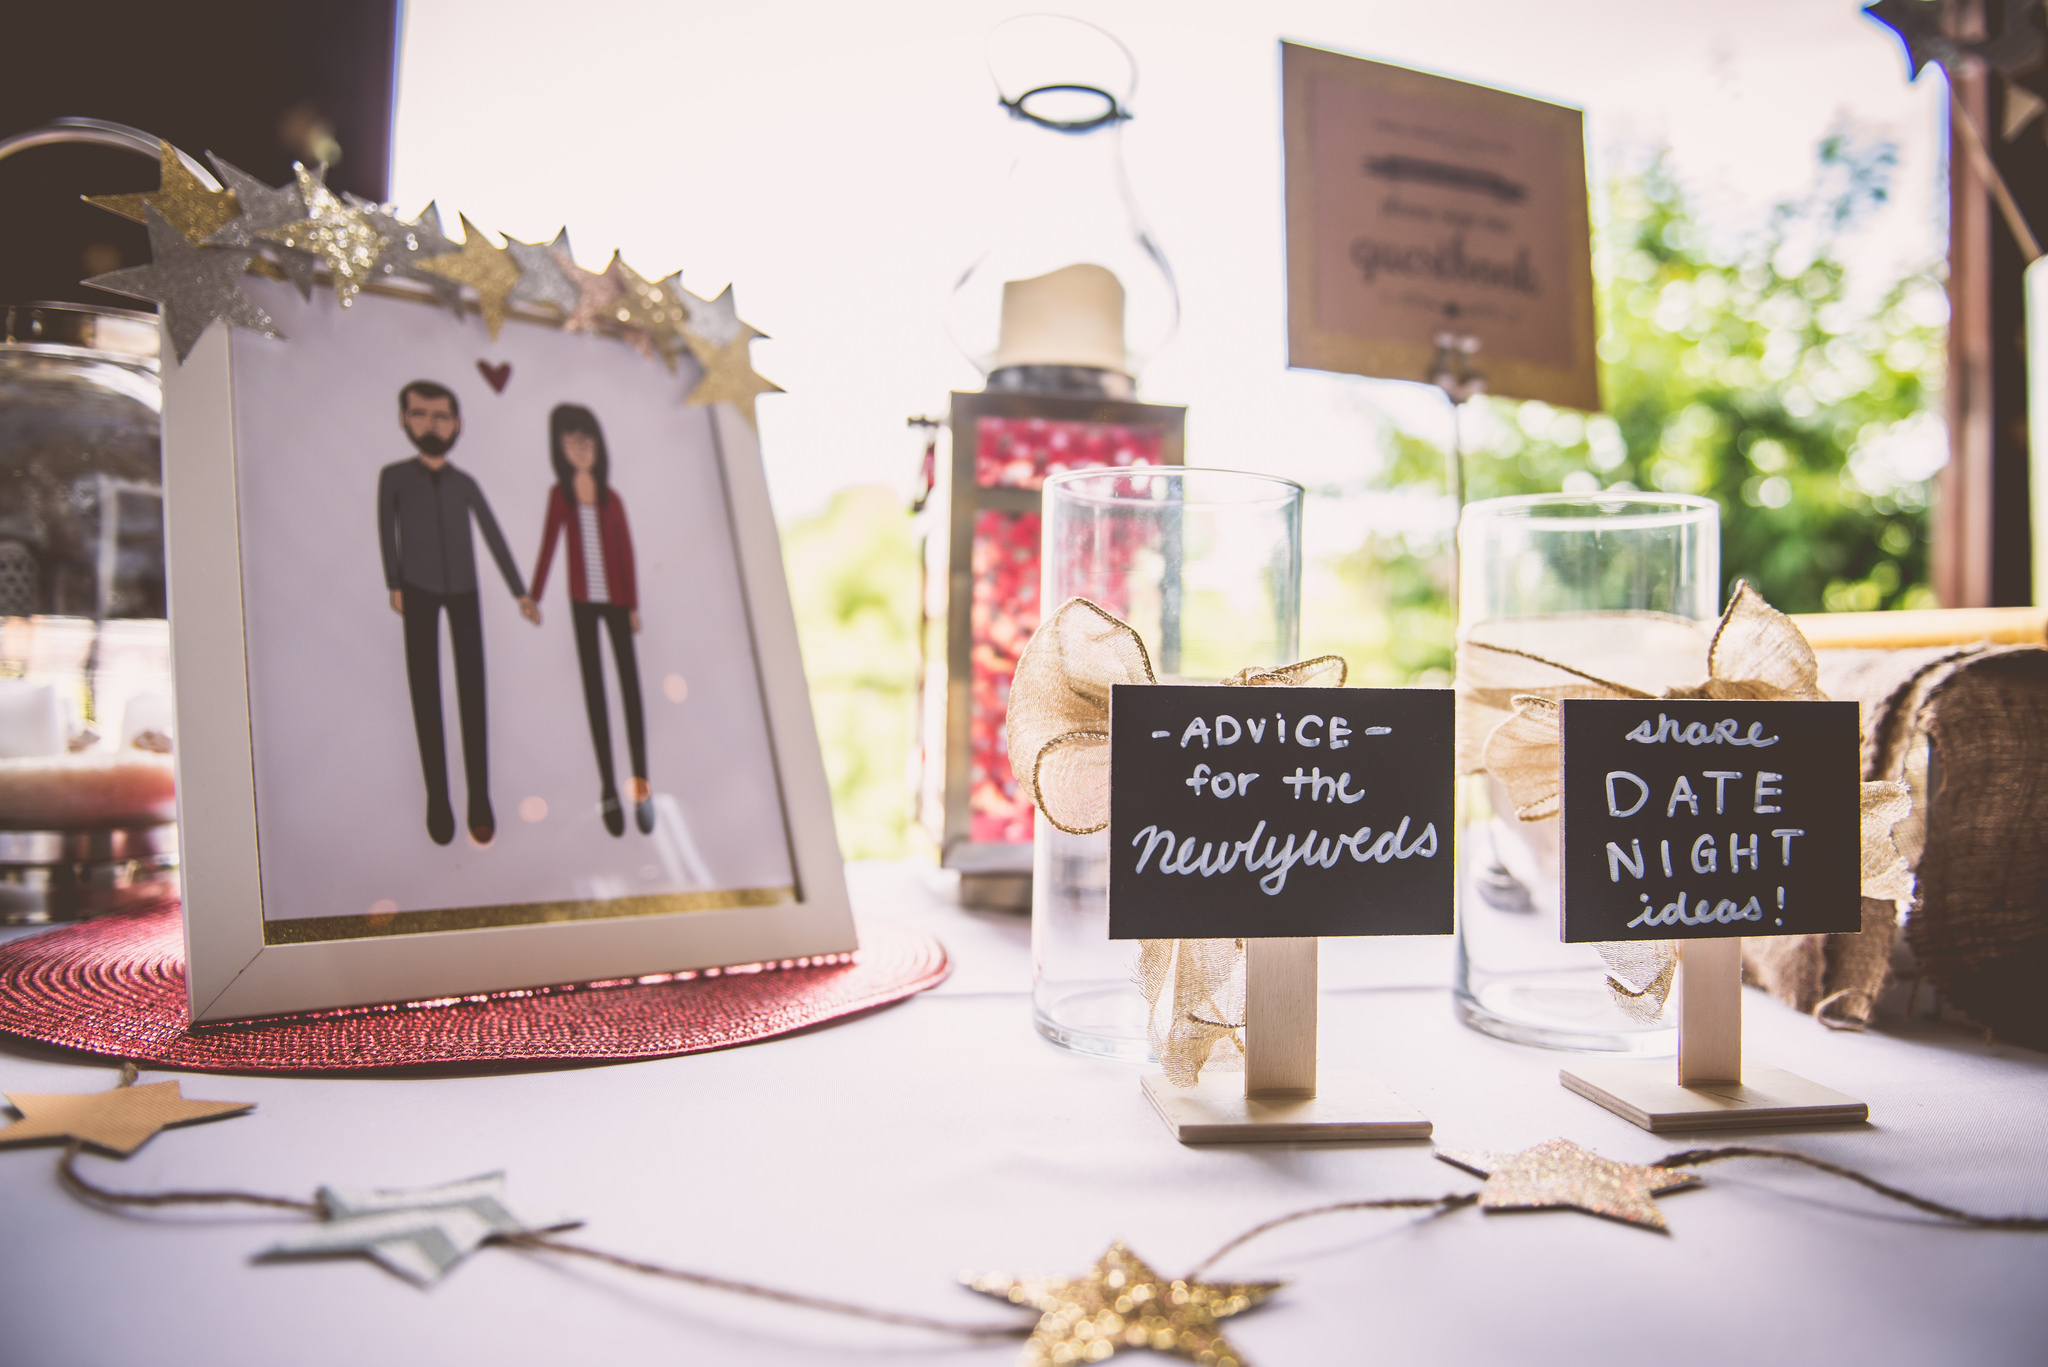
The welcome table was a place where people could sign the guest book and grab a fan program. I had found a couple of cute white lanterns and borrowed some others from my friend Merry. I found a gold and silver journal on sale for $3 at an office supply store, and made a little cover medallion for it. I reused the vases from the party my co-workers threw for us, where people could give us advice on how to have a good marriage. (The responses were great, of course.) The featured artwork on the welcome table was a cute drawing of Richard and me done by Tiny Buffalo Designs.
I knew I would need some vertical lift on some of the tables, so I snagged several wooden crates from a craft store and painted most of them red and one of them gold (it ended up at the kids’ table). That allowed me to plan for elements on multiple levels on each table.
The welcome table was across from an easel holding a chicken-wire frame (there’s that rustic stuff again) clipped with bunch of silly pictures of Richard and me as children. It had lights strung in it that I think we forgot to turn on for the ceremony. Oops!
Other touches worth mentioning:
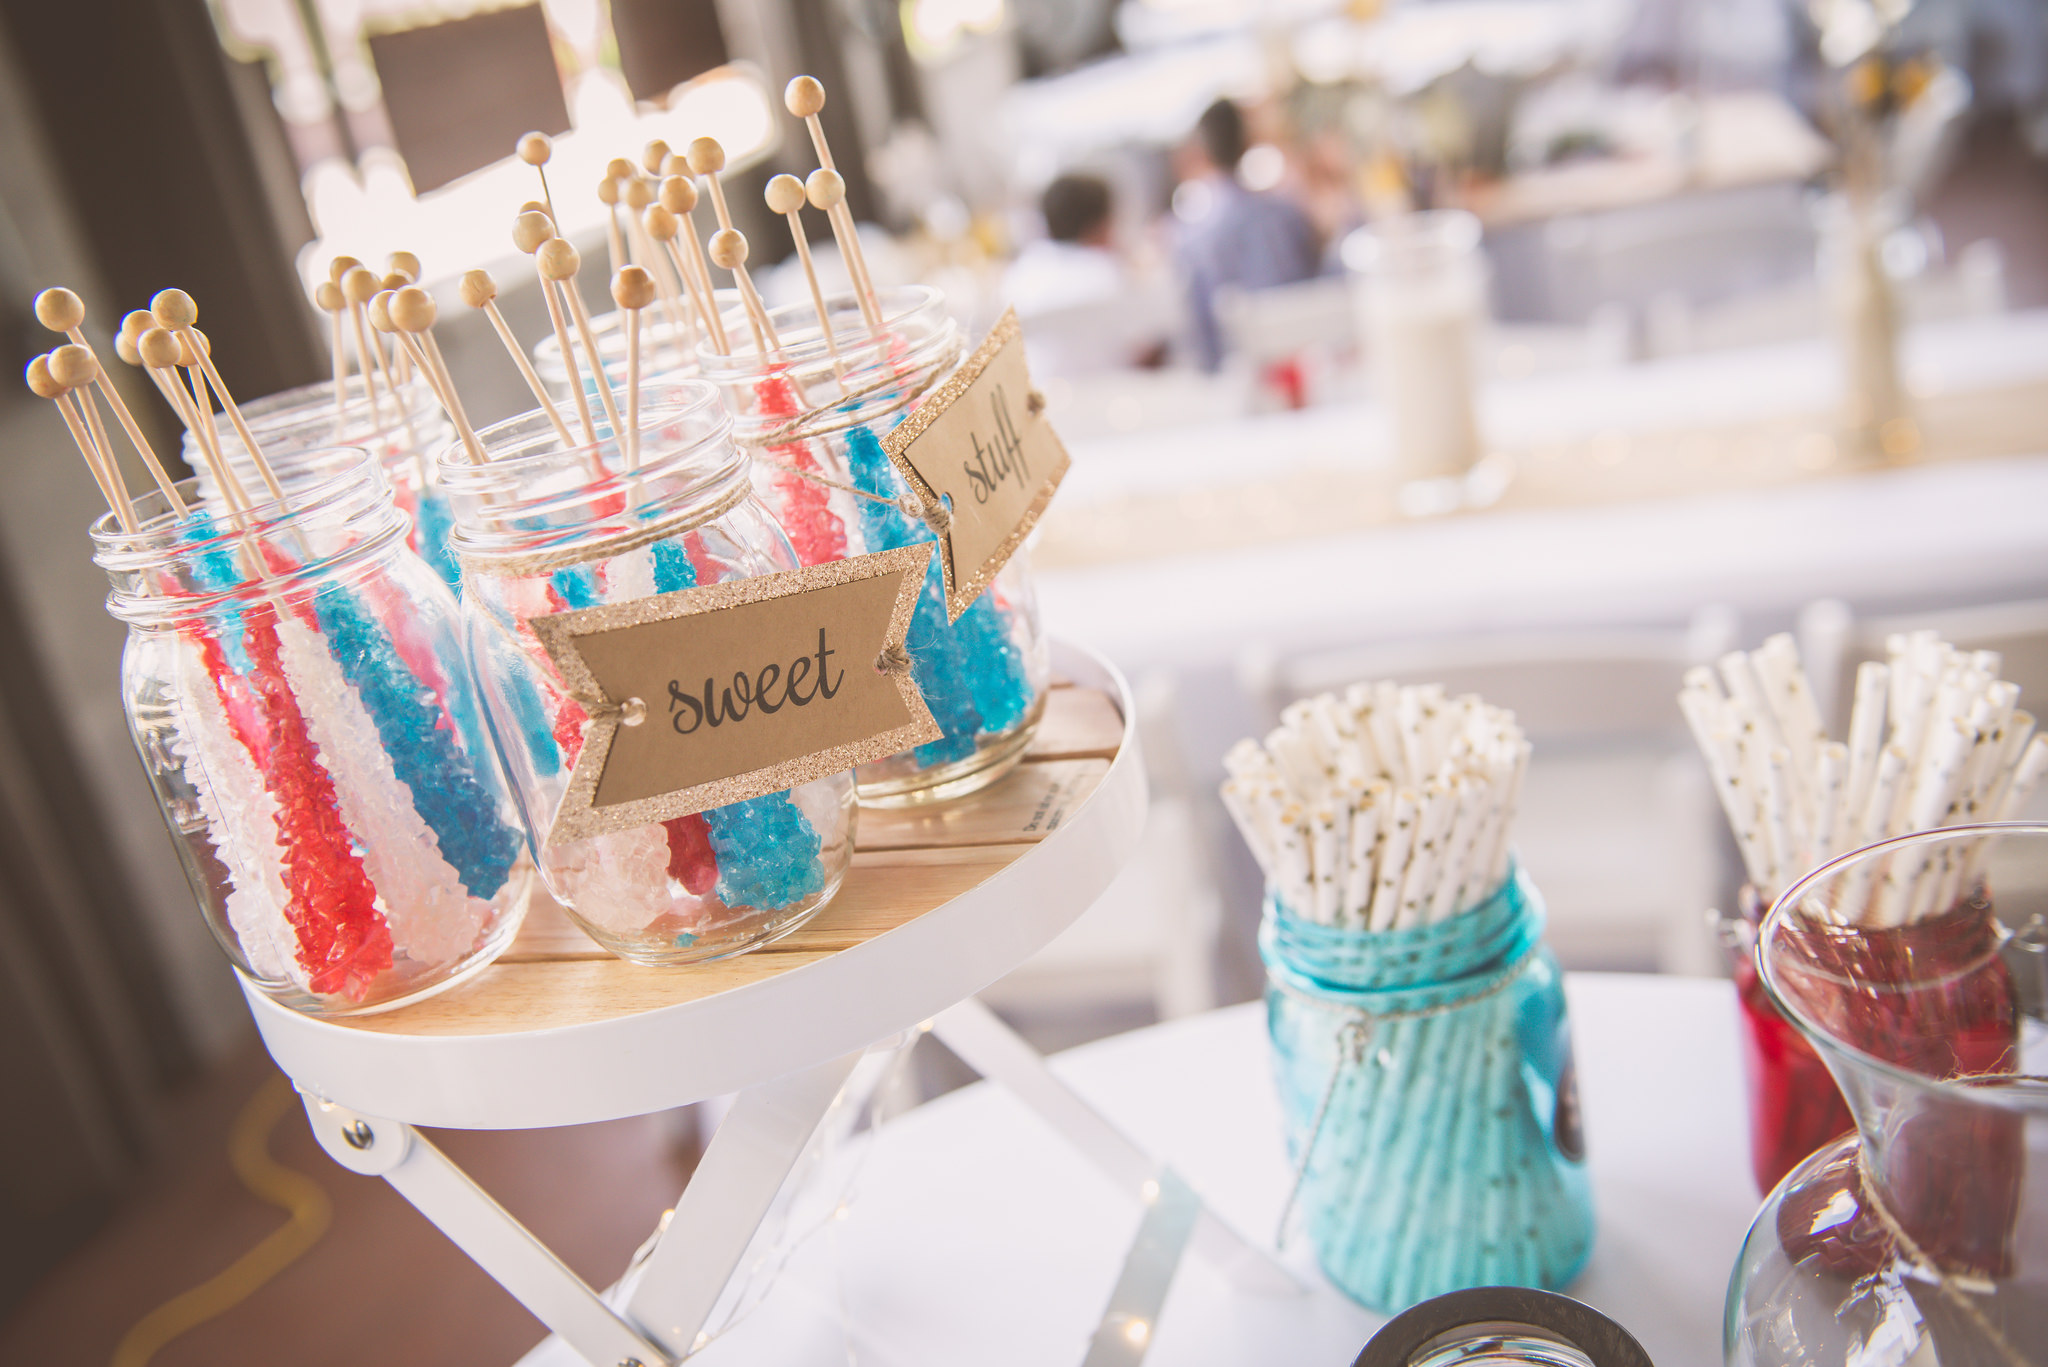
• We didn’t opt for the traditional cake, but instead went for a general sweets area, partially populated by cupcakes and brownies made by my friend Merry and Richard’s step-mom Debbie and mom Mary Jane (infinite thanks to them all). I wanted some red, white, and blue elements that wouldn’t be overwhelming, so I ordered some red, white, and blue rock candy sticks and put them in mason jars (draped with matching signage that said “sweet stuff”).
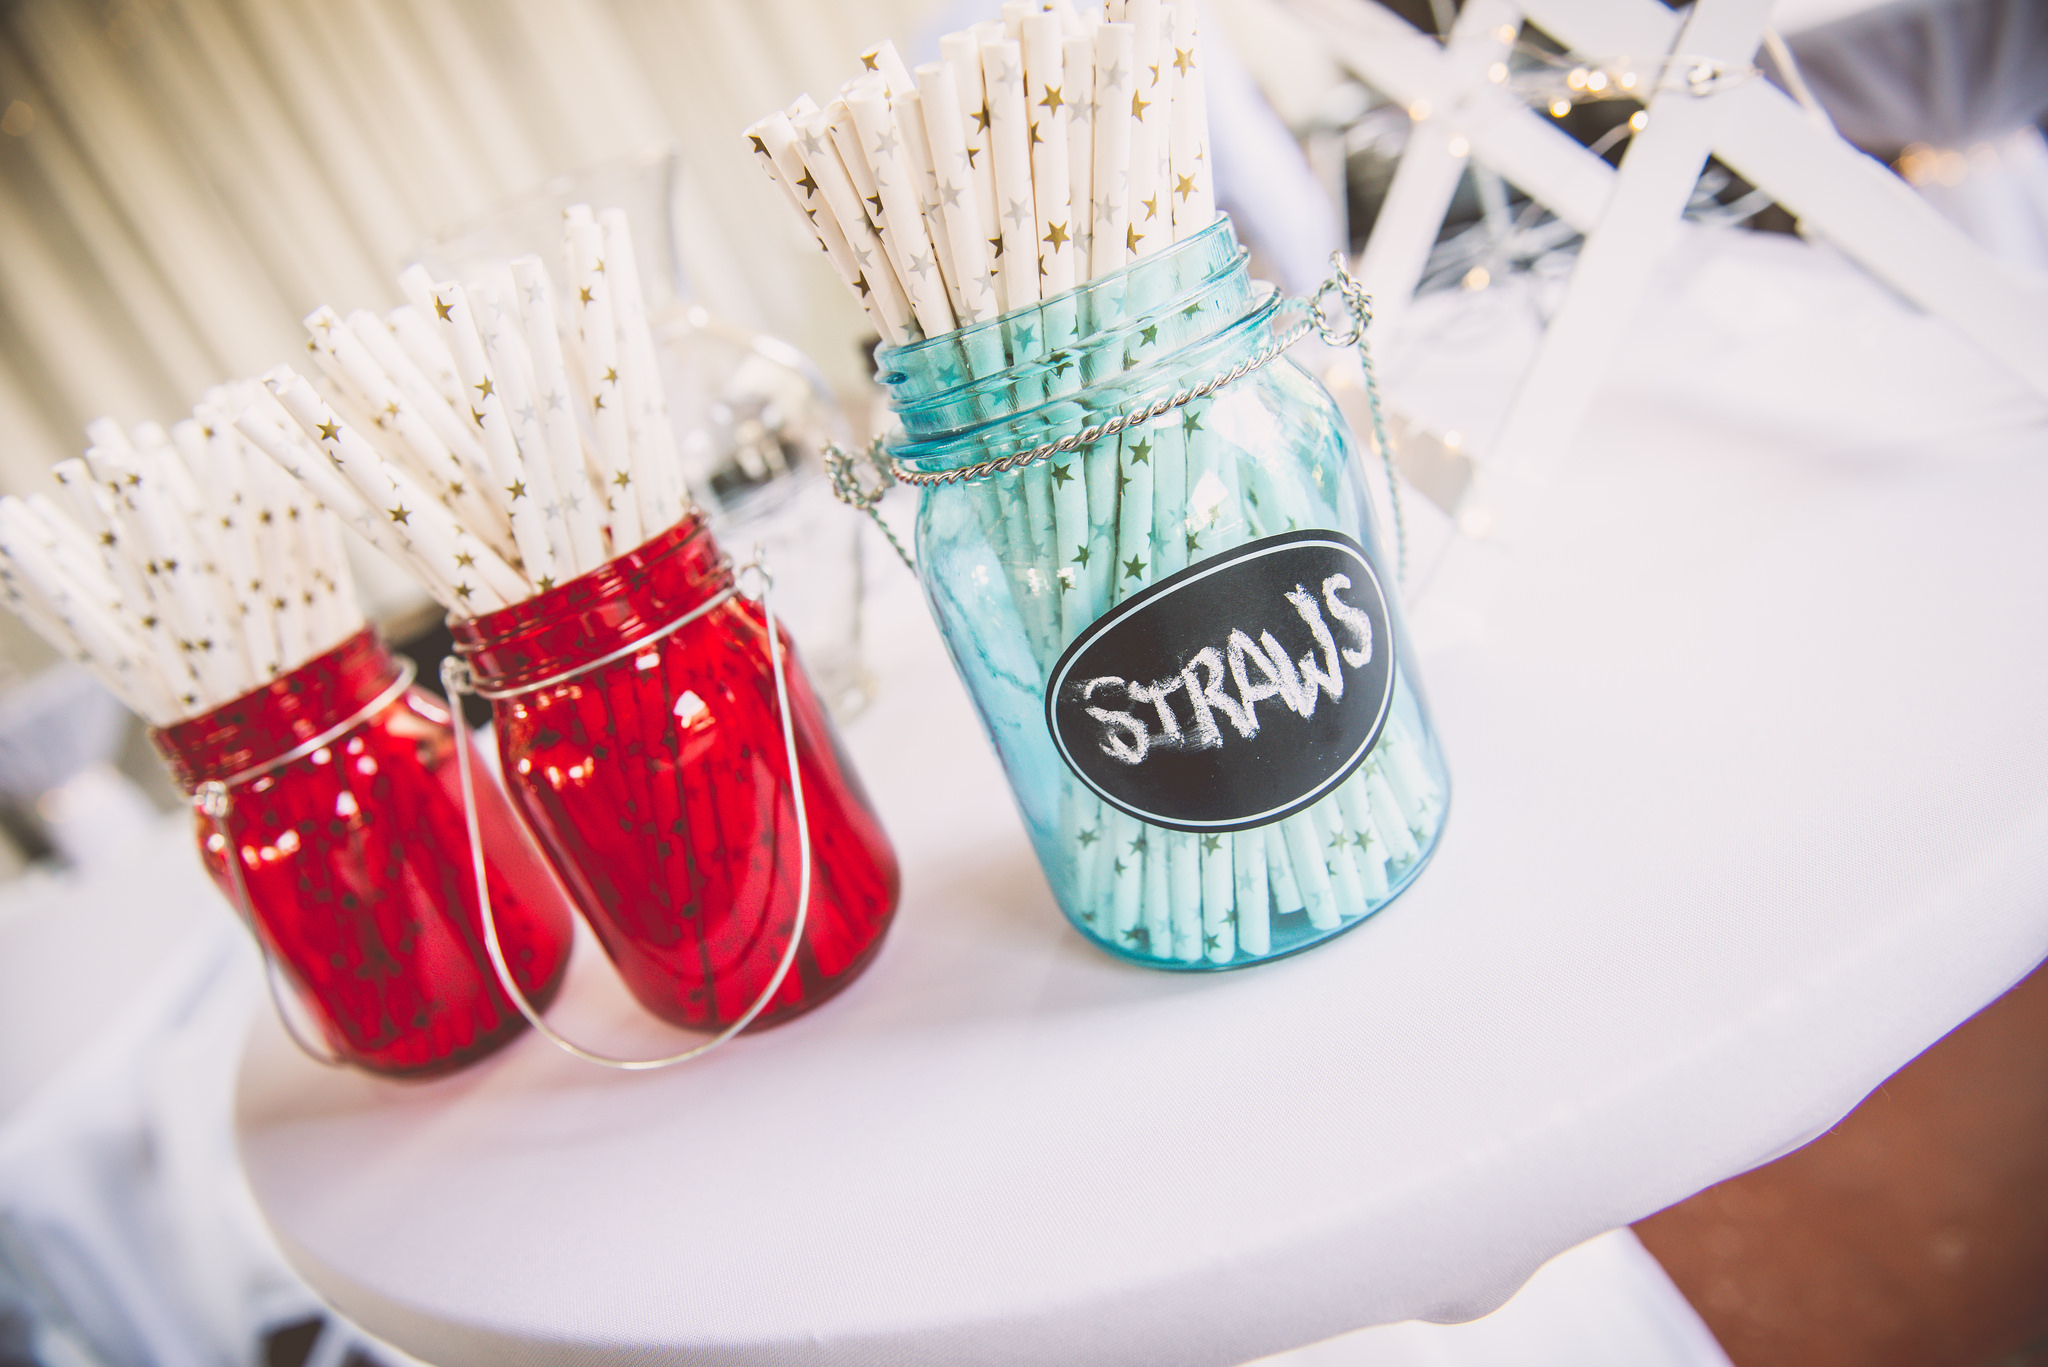
• I ordered cute little starry paper straws from The Party Gnome and put them in red and blue jars near the bar.
• Knowing that people were going to be getting hot and sweaty and possibly bitten by bugs, I stocked each bathroom with a basket of toiletries including deodorant, ibuprofen, bug spray, face-blotting tissues, a Tide pen, gum and more.
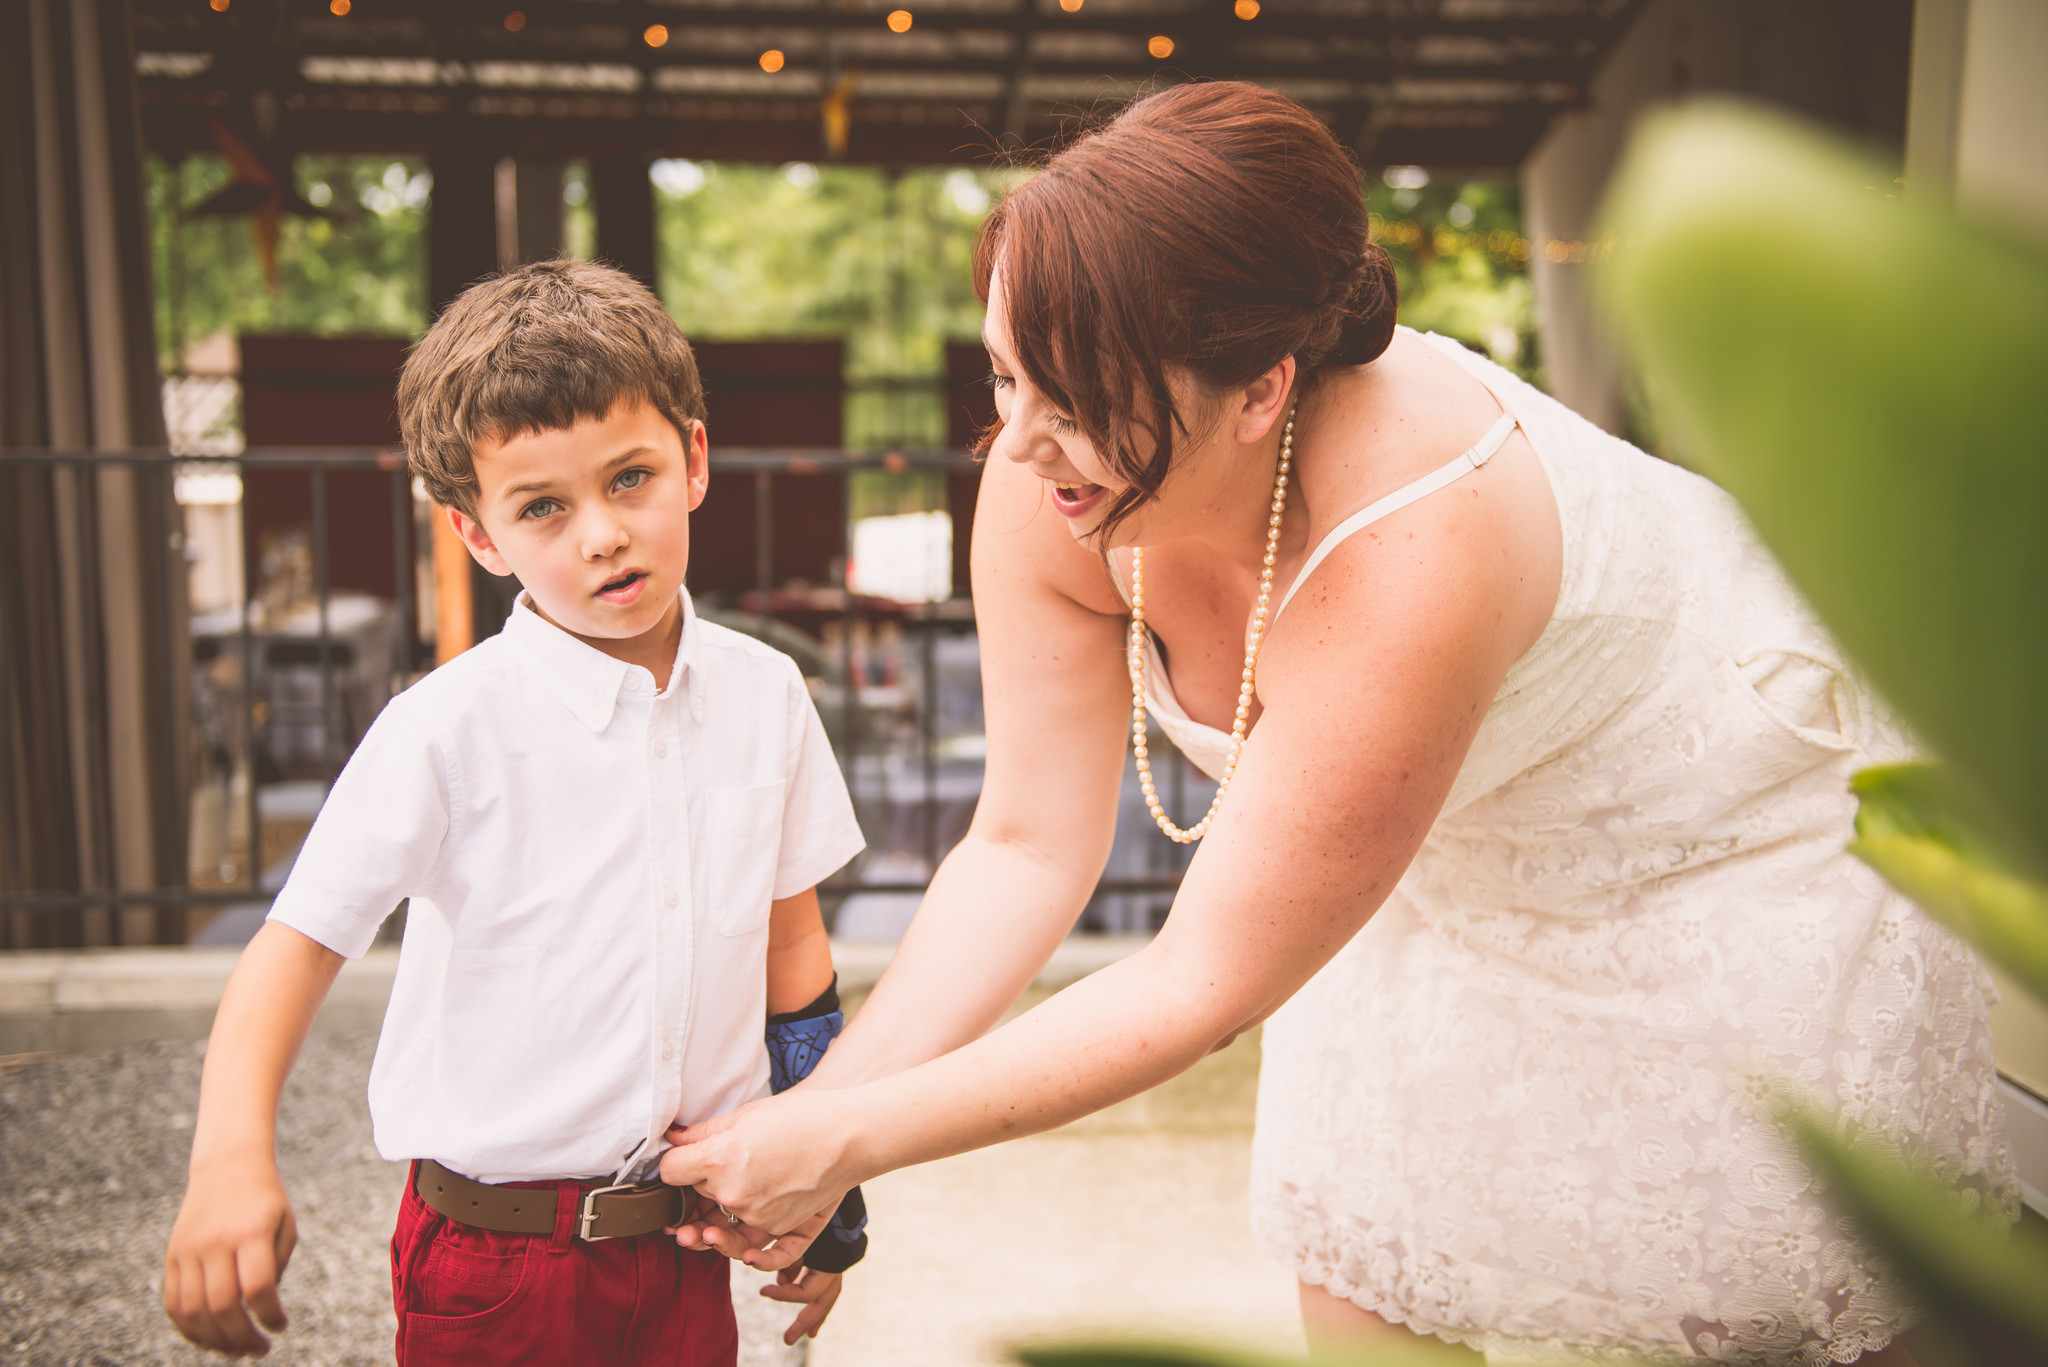
 • I dressed my own kiddo in a white shirt and red pants. He ended up breaking his wrist a few weeks before the wedding and ended up with a blue cast on the wedding day, which was some thematic serendipity, let me tell you. (He’s totally fine now and ran around all day and night, having the best time despite his injury.)
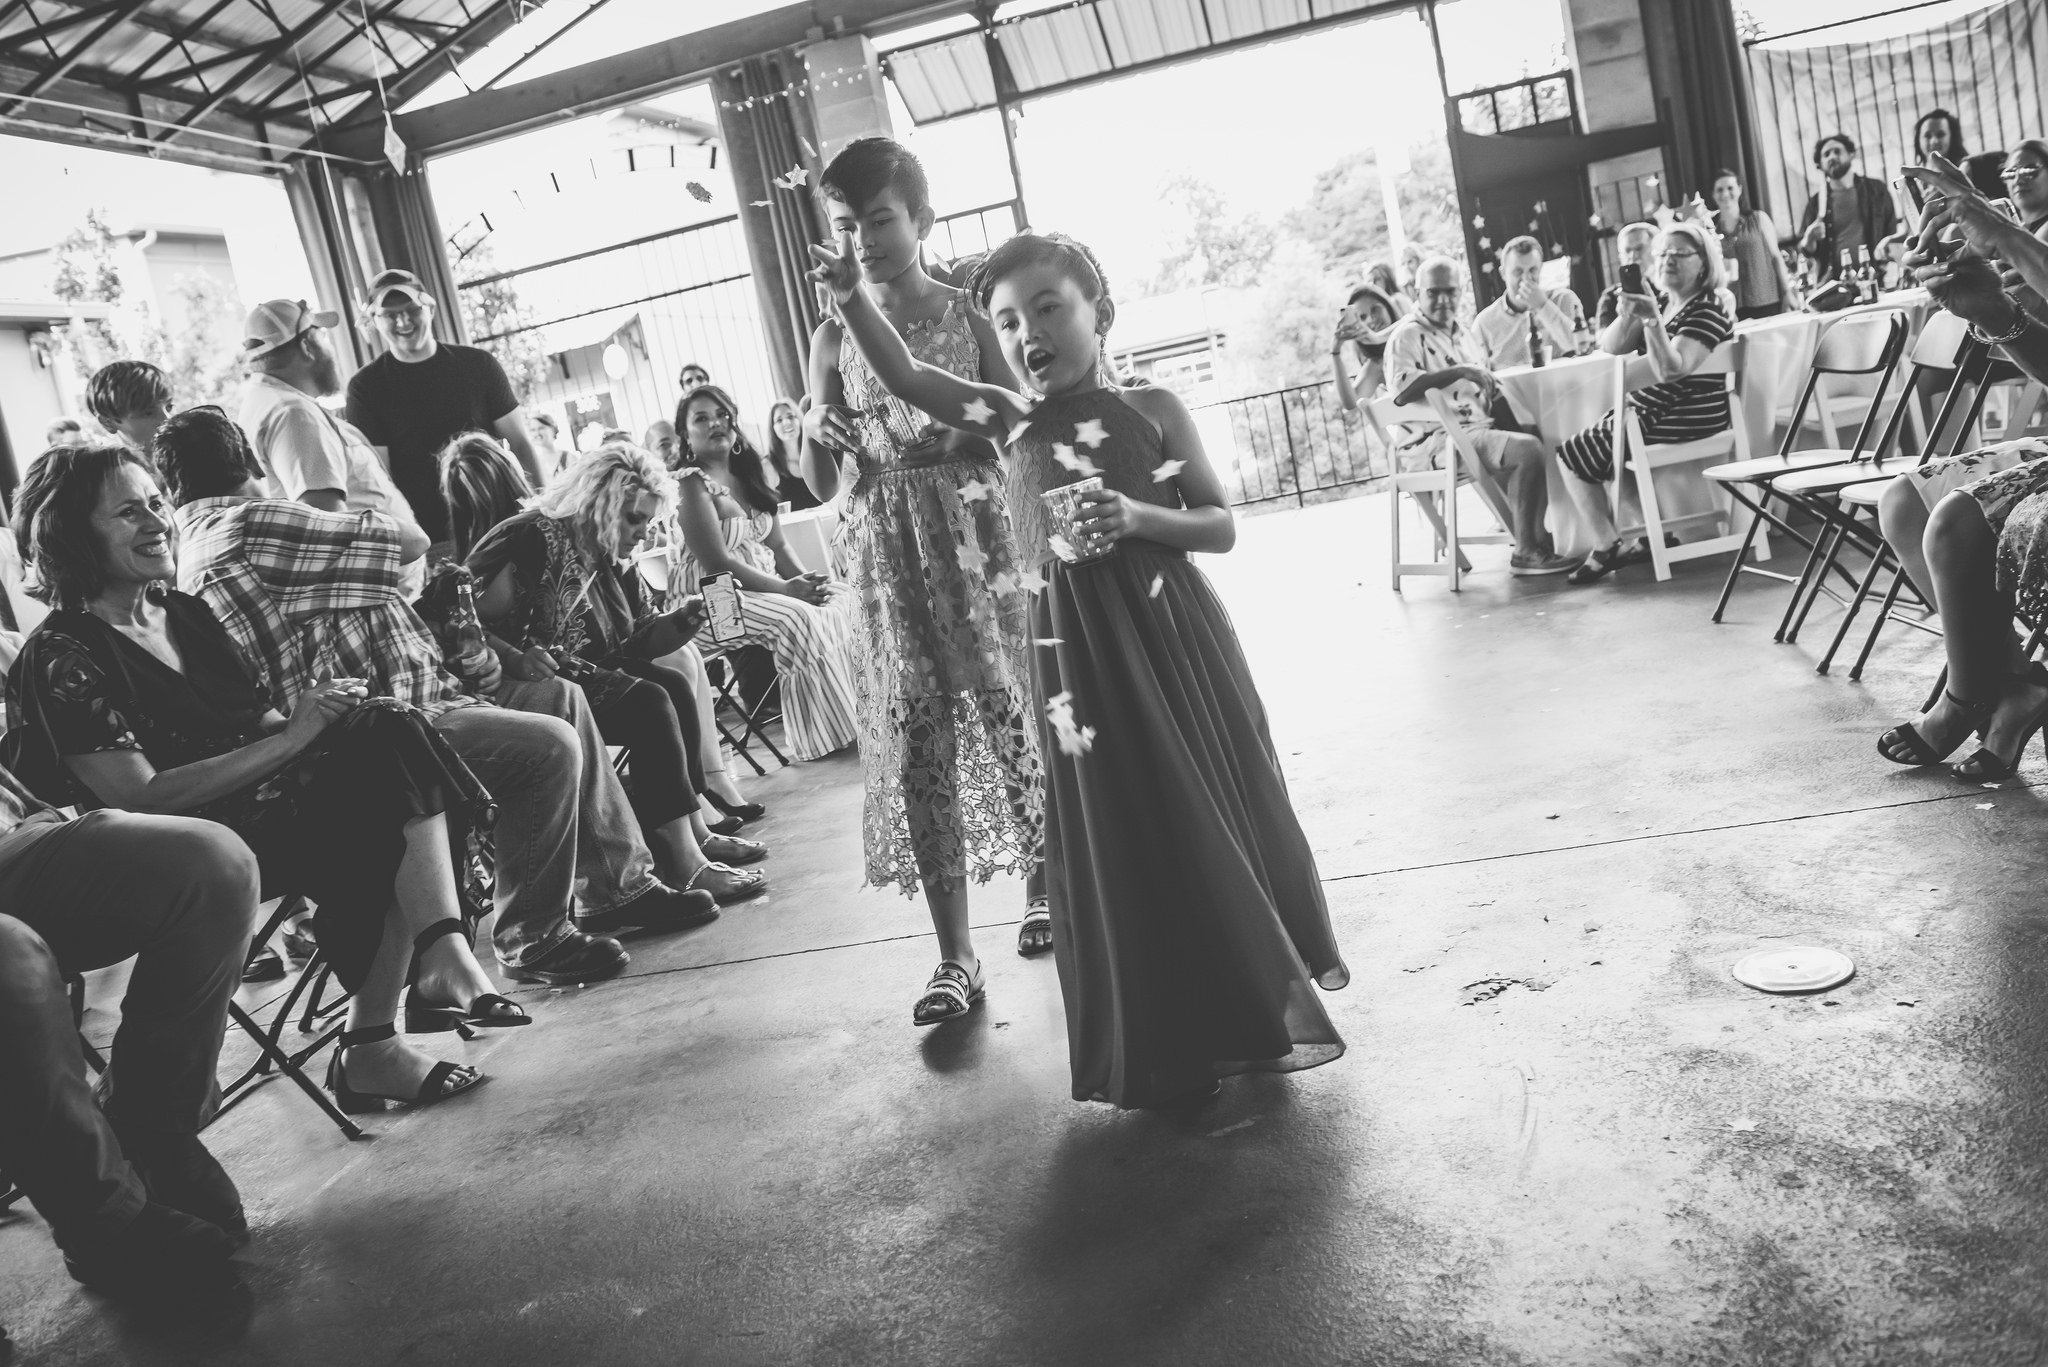
• Richard’s nieces, the flower girls, needed something to scatter even though we weren’t doing flowers. So I got some newspaper stars from Artsy Vintage Boutique, as a nod to my (erstwhile) career, and placed them in a couple of cute red votive holders. After the wedding, I gifted the votive holders to the girls as a thank you.
• I really wanted market-style lights strung across the venue, but it’s crazy expensive to rent those. (Funny story — the rental place accidentally dispatched the light guys to install lights the day before the wedding. So when we arrived to do setup, we were shocked to see lights being hung. They called their bosses and — long story short — took down the lights they had just finished putting up.) So we just bought a bunch of white Christmas lights and, with the help of Richard’s brother and some zip ties and ladders, strung them up. They looked great. We also bought a couple of cheap sound-activated party lights from Amazon and strung them up near the center of the room, and routed them to an outlet controlled by one of the light switches. When the sun went down, it looked like a disco floor. Big thanks to my friend Kristin for lending us her laptop, which we hooked up to a boom box, and used to play our reception playlist.

• I got a bunch of star-shaped paper lanterns online and we hung them throughout the venue. We clustered several of the big ones in the center, where we planned to have the ceremony, and put battery-powered LED string lights inside for an extra glow.
 • I got a great deal on my dress from ModCloth. I had originally bought a dress that was a smidge too small, delusionally thinking I’d do that thing where I lost weight before the wedding. El-oh-el. So when I realized I was not on track to be a size smaller by the big day, I bought a backup dress for $125. The backup dress had POCKETS, so it was worth it and then some. I ended up liking it better than the first dress.
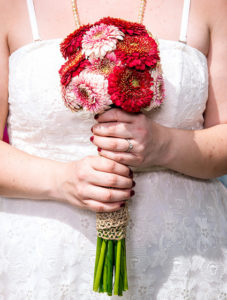
• I did opt for a bouquet for myself. I bought a handful of long-stemmed gerbera daisies (the flower shop shorted me on the number of red ones I requested, so I came away with pink too) and secured several of their stems with wire, wrapped them up with scalloped burlap ribbon, and pinned them. I used a tutorial online so it was pretty easy. I think the bouquet turned out super pretty, even with the pink (even though, looking back, I should have cut the stems shorter). And despite the fact that the flower shop didn’t give me a discount even though they shorted me on red flowers (and I am not bitter at all), the whole thing cost less than $40.
• I did my own makeup, which I knew I would be sweating off anyway, so I tried not to get too freaked out about it. I ended up trying a couple of different foundations — nothing too fancy — and used a facial antiperspirant and setting spray for good measure. I sweated A LOT, but, thanks to the magic of our fabulous photographer, somehow I look halfway decent in most of the pics. I wanted a neutral but shimmery eye shadow, and Mac’s Woodwinked did the trick. I ended up splurging on lipstick, since I wanted something that would basically be tattooed on my face so I wouldn’t have to worry about it or reapply for several hours. I ordered some inexpensive peel-off lip stain off Amazon and had mixed results. Then my friend Katie told me about LipSense, which she uses, so I ordered a pricey tube of Caramel Apple and its accompanying gloss and was very pleased with the results, even though the color stain stings when you put it on.
• My fabulous sister-in-law Chevi did my hair and applied fake eyelashes for me for some extra eye drama. My instant uglycrying when walking down the aisle laid waste to one of the eyelashes, which I plucked off my face mid-vows. Chevi really outdid herself for the hair. It was this lovely chignon, framed by a braid, with a few loose tendrils of hair curled around my face. You can’t tell by looking at pictures, but my hair was FILTHY. Just the way she wanted me to leave it for maximum grippiness! It was such a beautiful style and stayed up all night. If I could do my hair that way every other day, I would.
Kids’ table
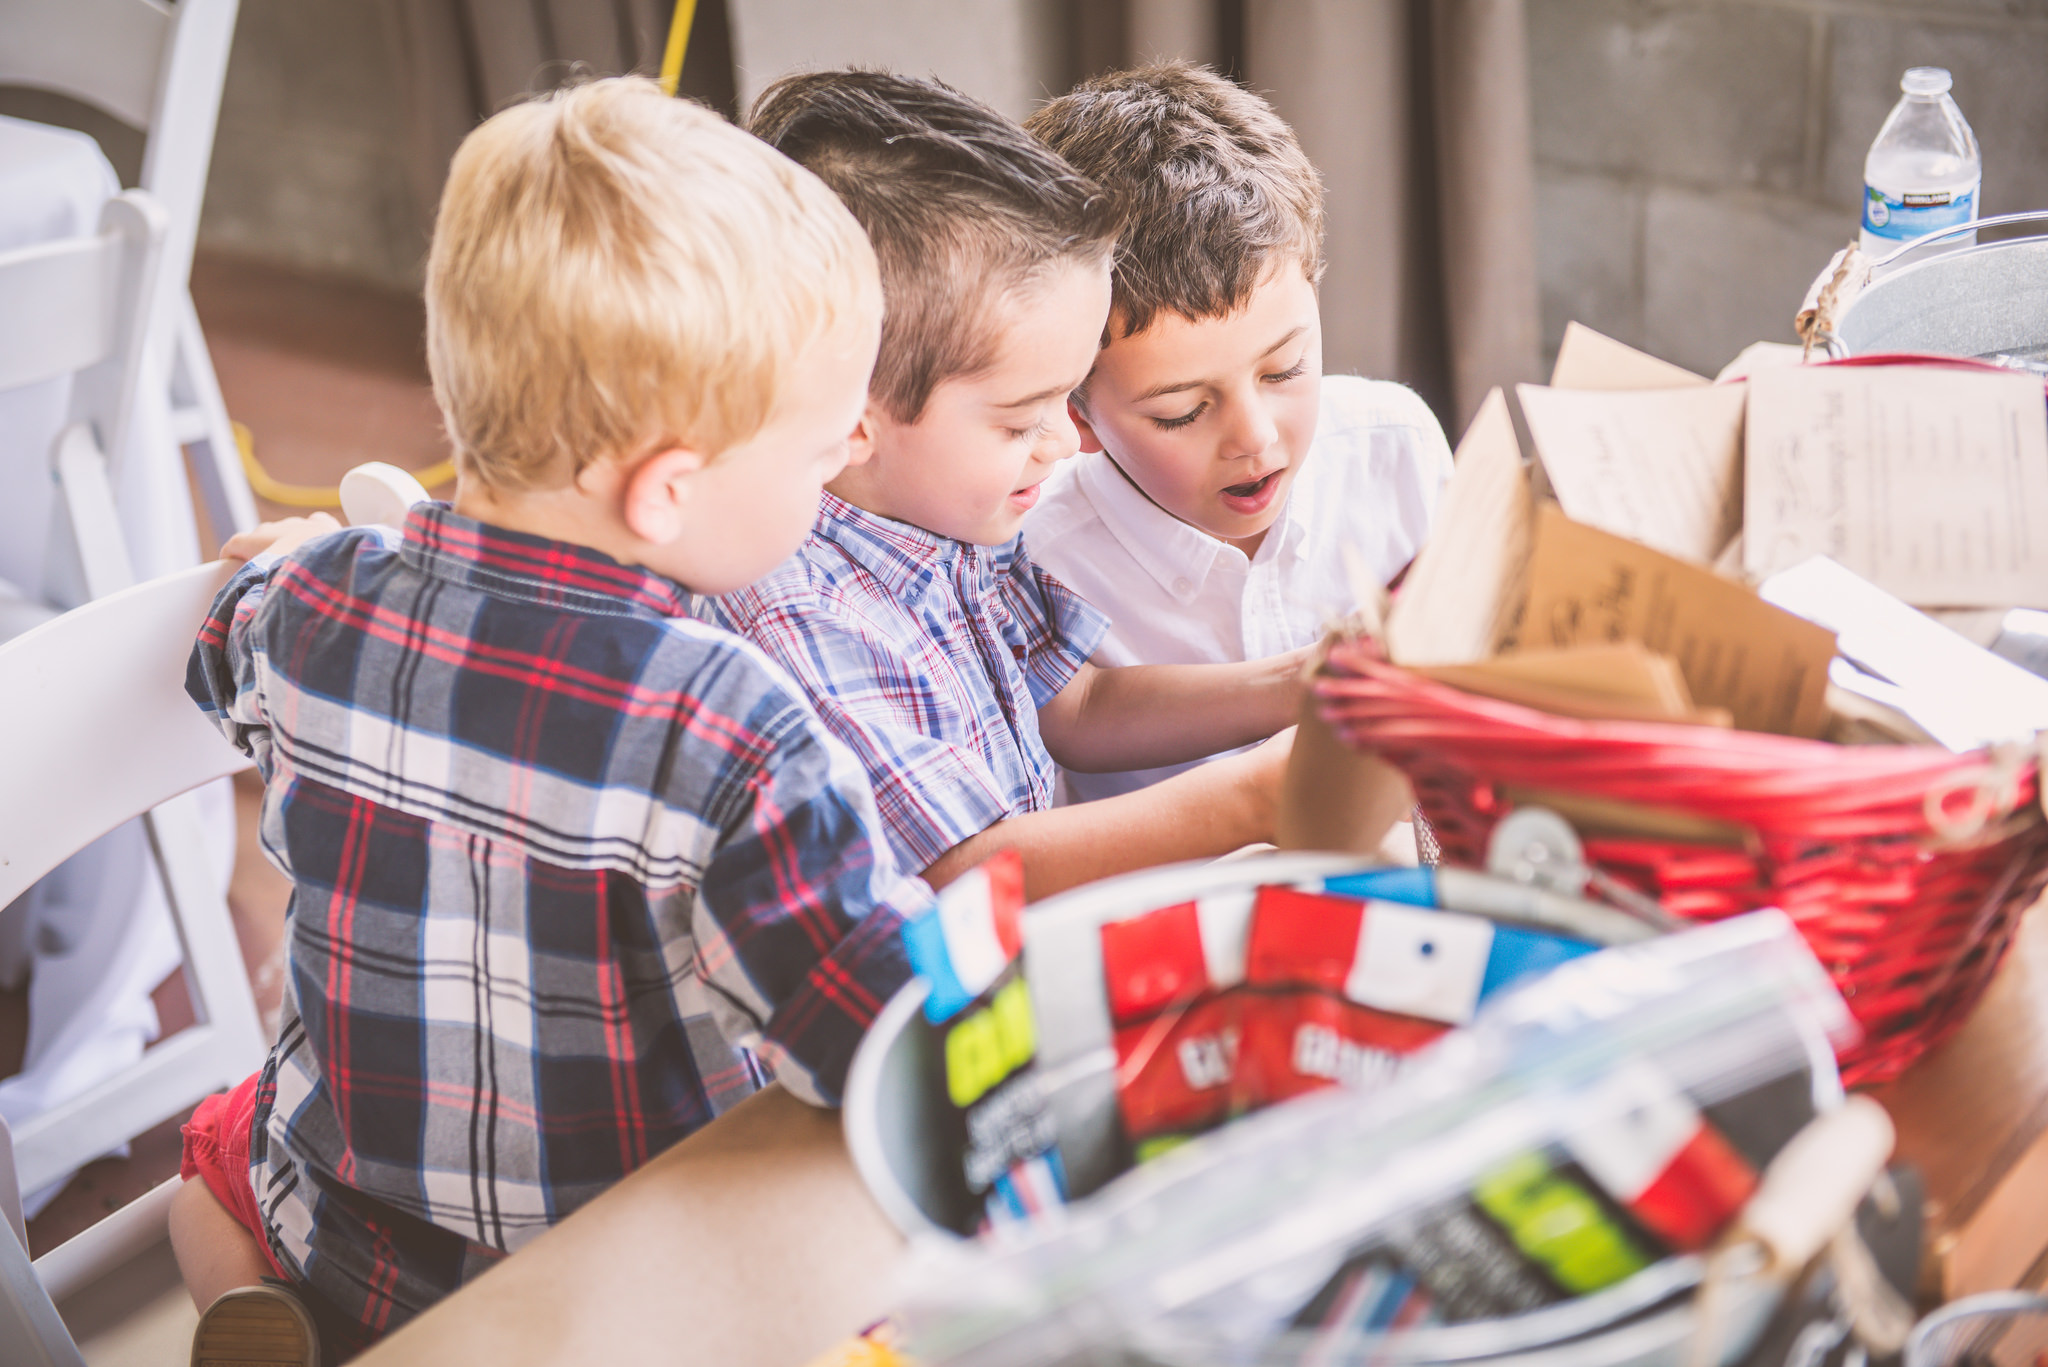
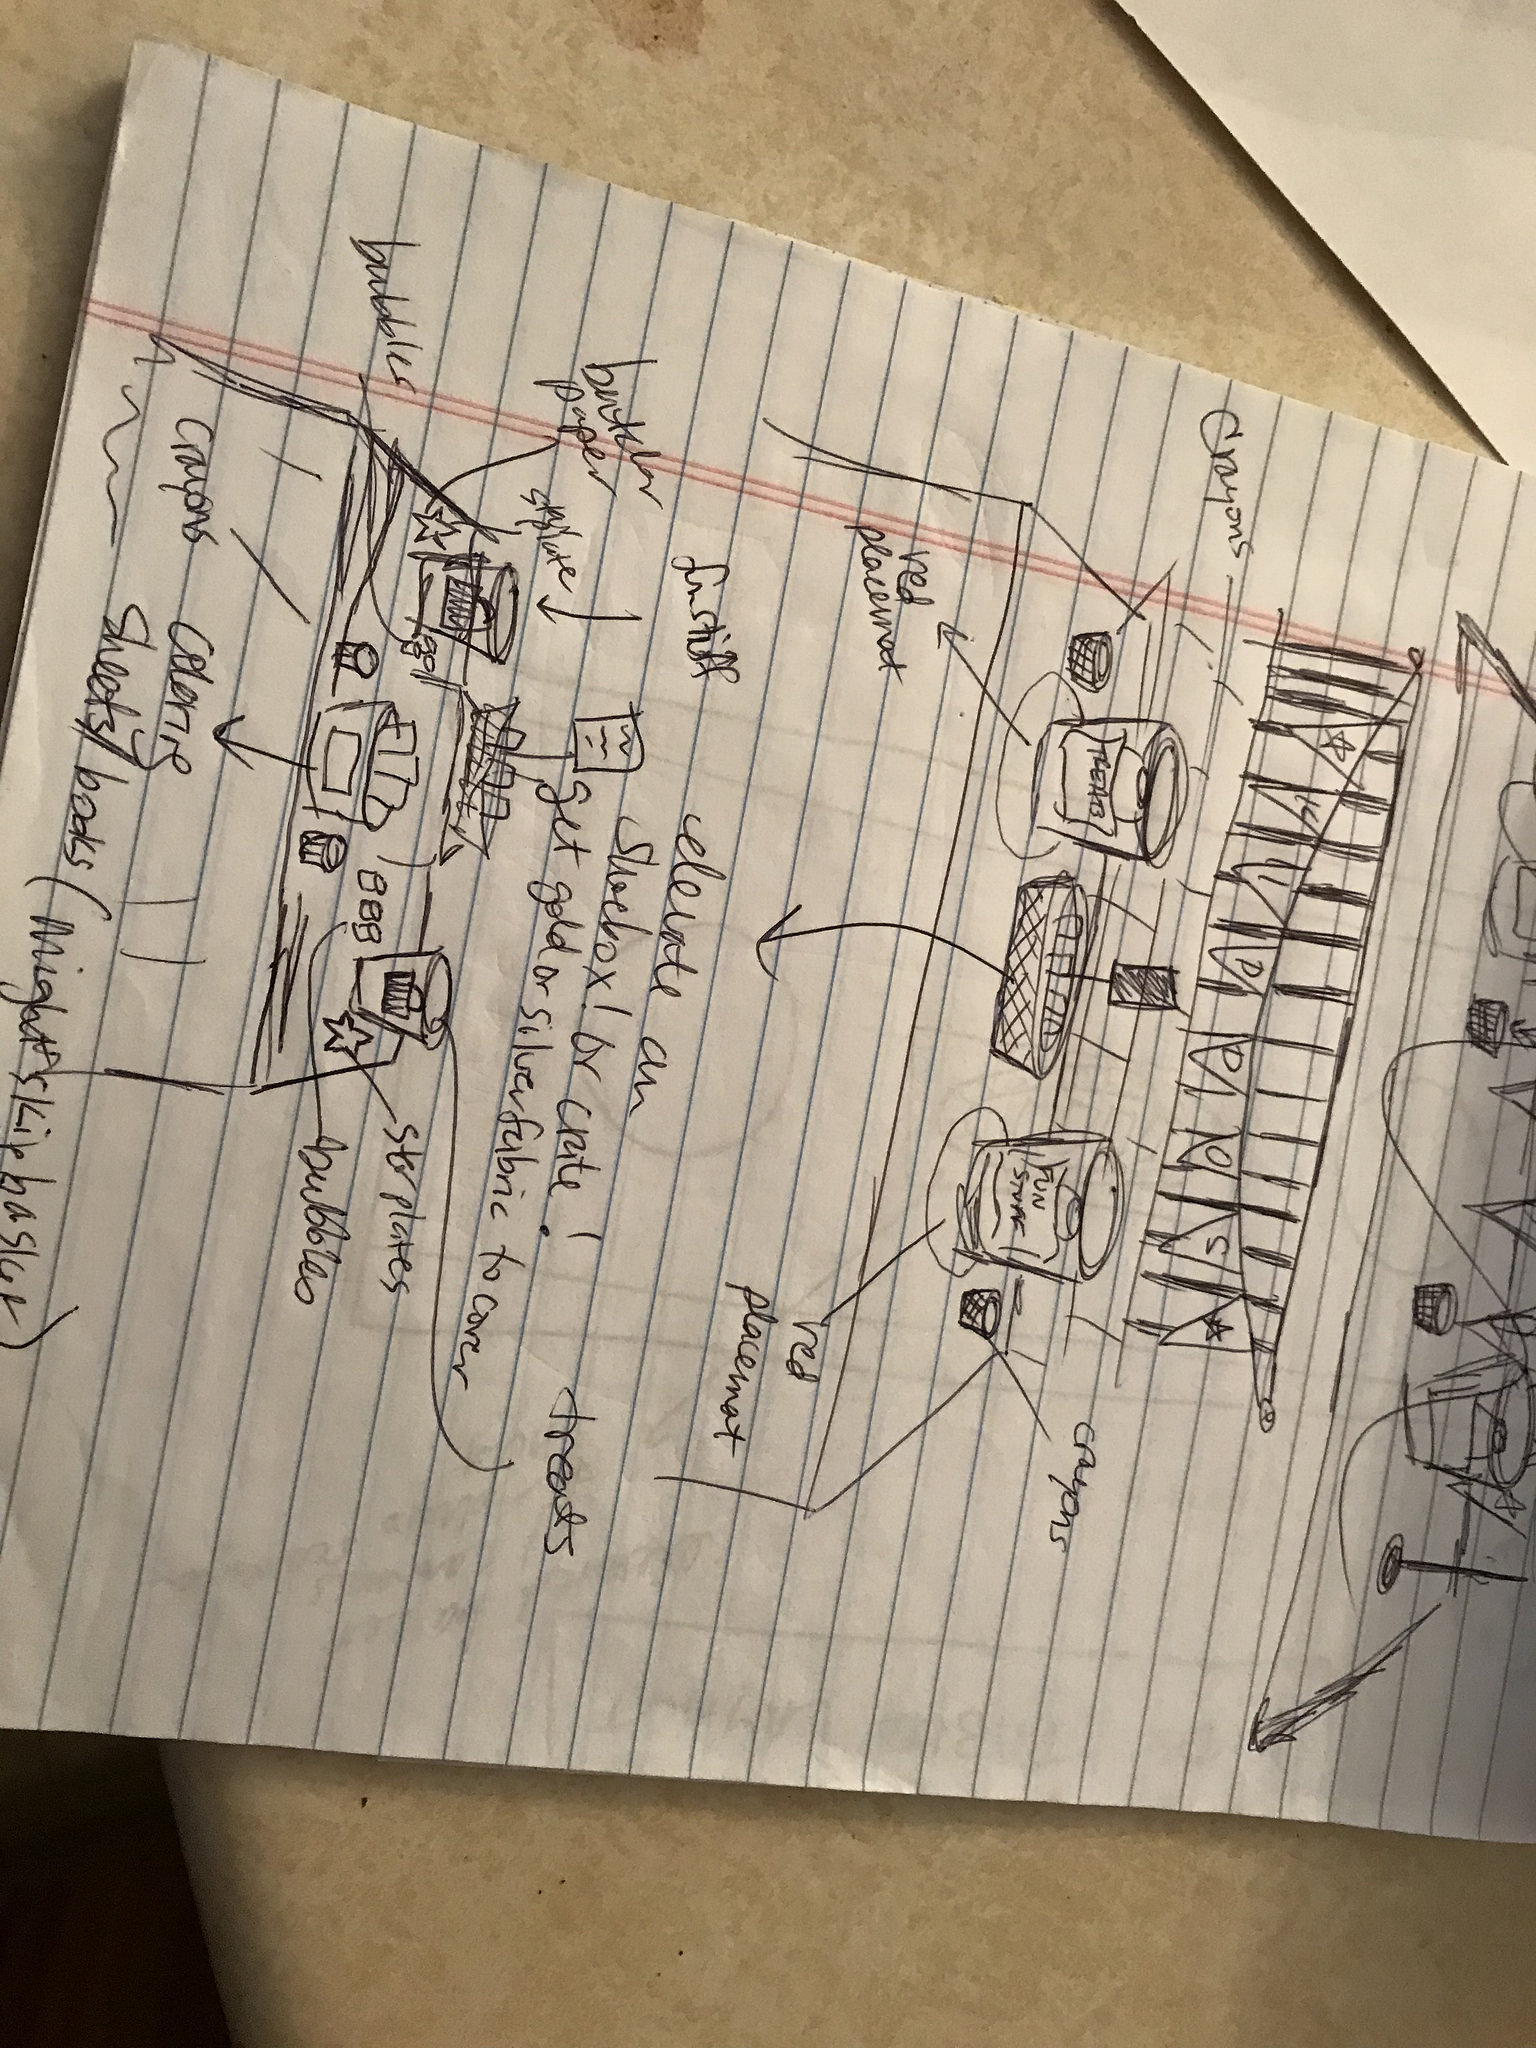
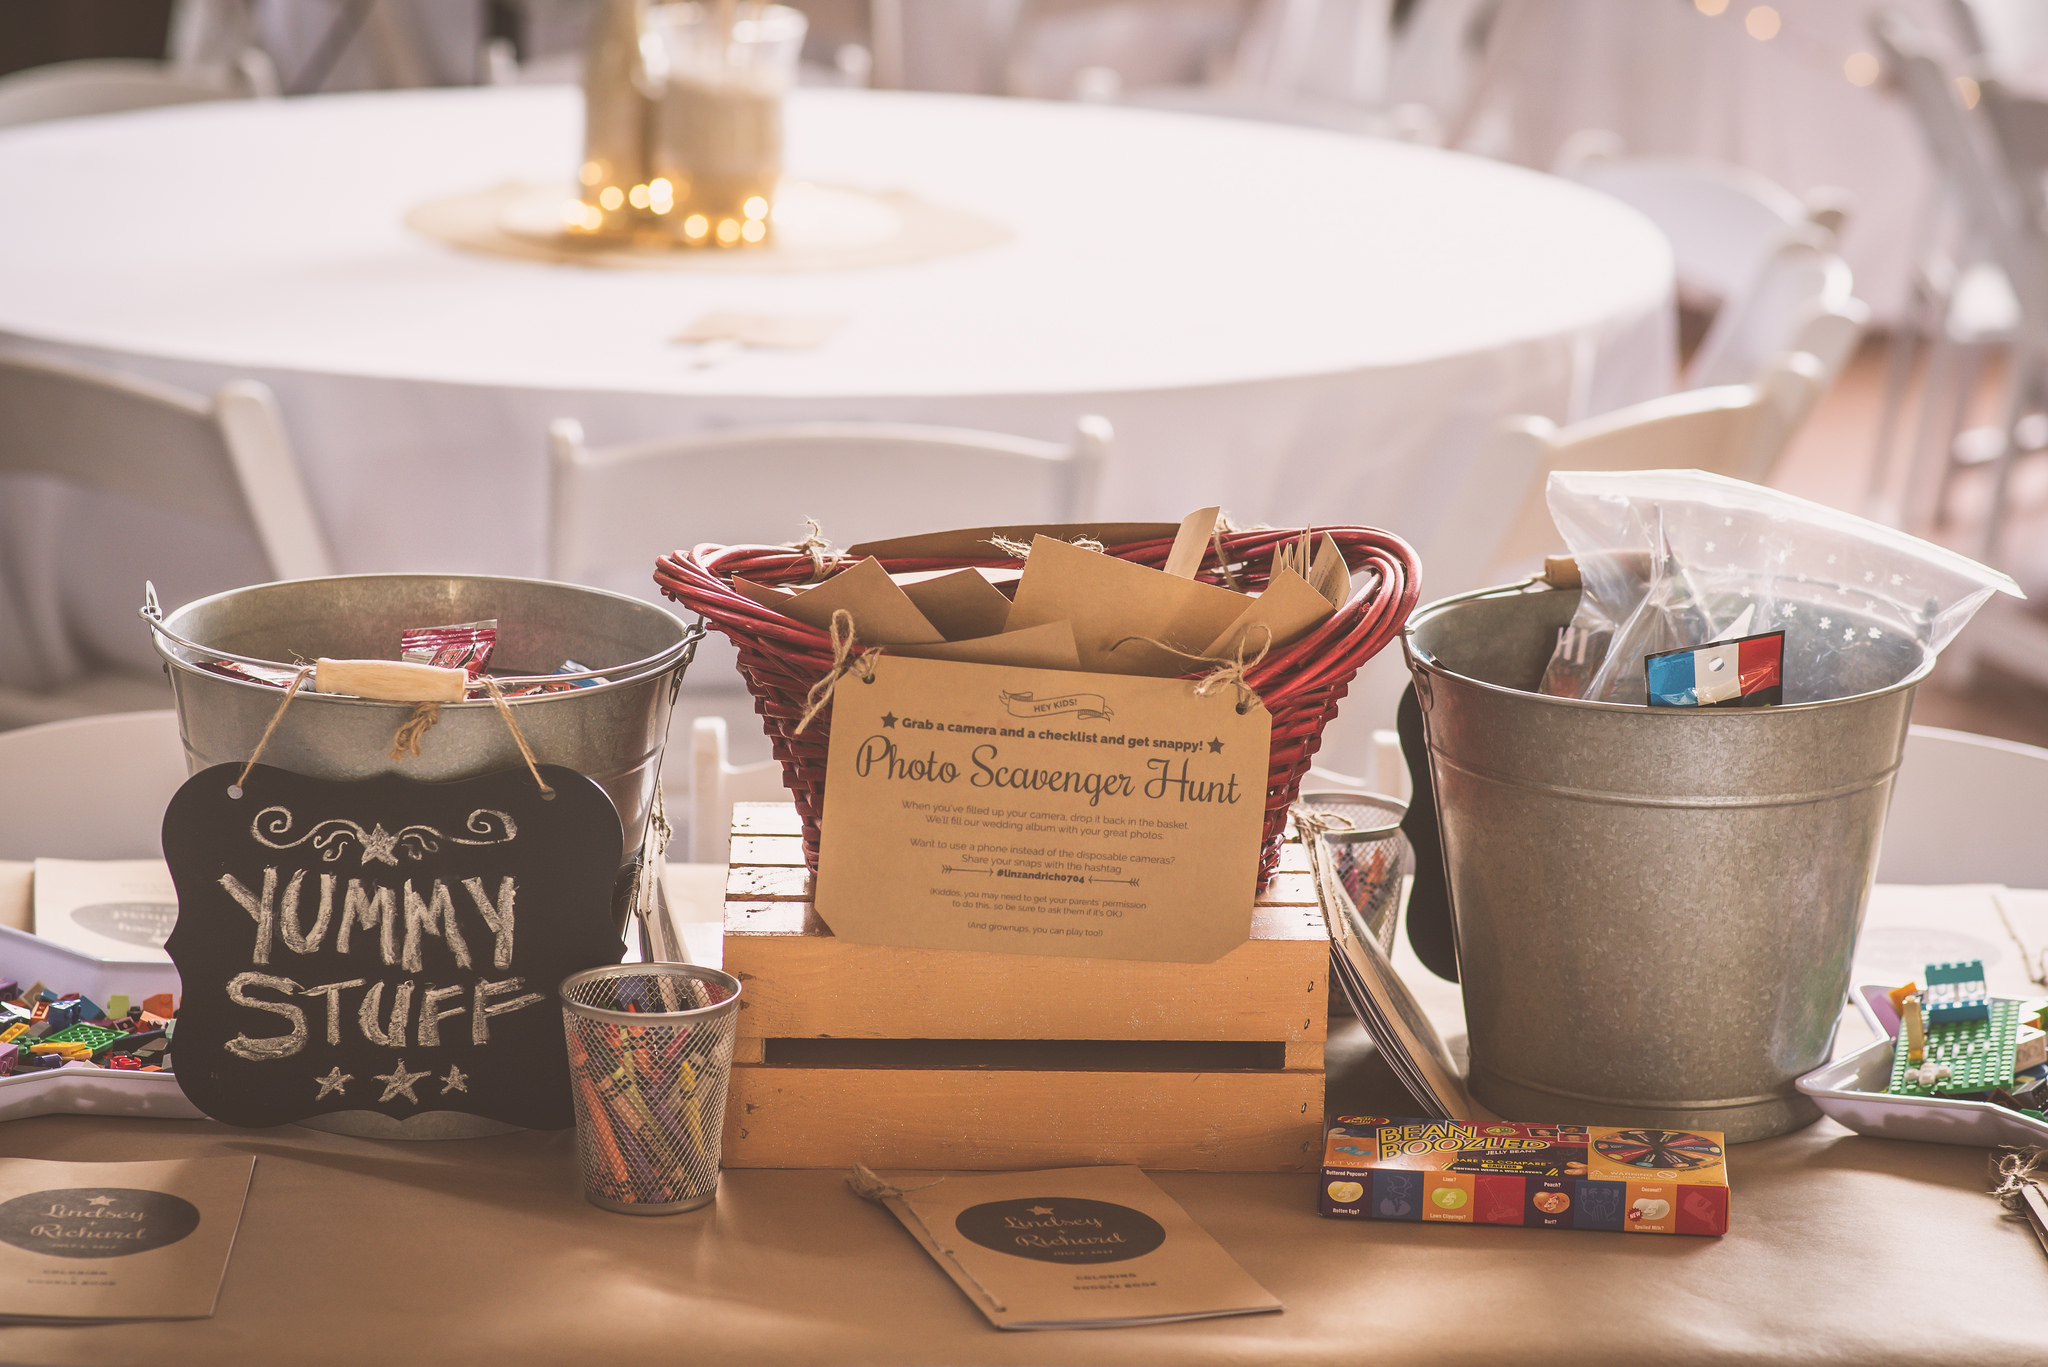
The kids’ table was really important to me. I knew my own kiddo would be there and in need of stuff to do, and I had specifically included wording on the invitation that kids were welcome. So I did a bunch of research on kid-friendly wedding ideas and stockpiled ideas for low-key activities you could put out, buffet-style. I bought a bunch of classic Legos and put them out in star-shaped plastic platters I got on the cheap. I put a bunch of silly Fourth of July stuff — light-up necklaces, temporary tattoos, funny sunglasses, neon flags — in a bucket labeled “silly stuff” for the kids to dig out. I had an identical bucket labeled “yummy stuff” on the other side of the table that had snacks inside. I made a handful of small coloring books (flag- and fireworks stock art and a colorable picture of Richard and me inside, kraft paper exterior, bound by twine) and put two baskets of crayons on the table. I also put out a basket of disposable cameras, tied to a checklist of items they could hunt for in a photo scavenger hunt. I put out a couple of Beanboozled games, for the older and more adventurous kids. And bubbles. I put tiny bottles of bubbles on the table. And we covered the table in brown butcher paper so we could feel better about the fate of the rented tablecloth underneath.
I’m pretty sure the kids’ table was destroyed before the wedding even started, so I didn’t get a photo of it all set up and looking sharp.
Oh, and we also put out a small ring-toss game on the ground near the table.
Most of the kids spent much of their time running around and playing hide and seek around the Shops at Fatherland. But I think the kids’ table was a hit. I had more than one mom tell me she loved being able to send her kiddos over to the kids’ table to entertain themselves if they got fidgety.
Our wedding was so much fun and I am so happy with the way everything came together. It was a ton of work and there’s no way we could have pulled it off without the help we got from friends and family. But, it’s good to know: It’s possible to have a great time and put together a fabulous wedding without spending tens of thousands of dollars.
For even more photos of our DIY wedding, check out this slideshow:
The good photos in this post are by John Mathis. Thanks, John! Everyone in the Nashville area looking for a fantastic photographer and an all-around nice guy with two adorable kids of his own: HIRE JOHN!
One reply on “Making a wedding”
[…] for my upcoming July wedding. I designed and crafted my ass off. You can read about those efforts here, as I have finally recovered enough to write about […]